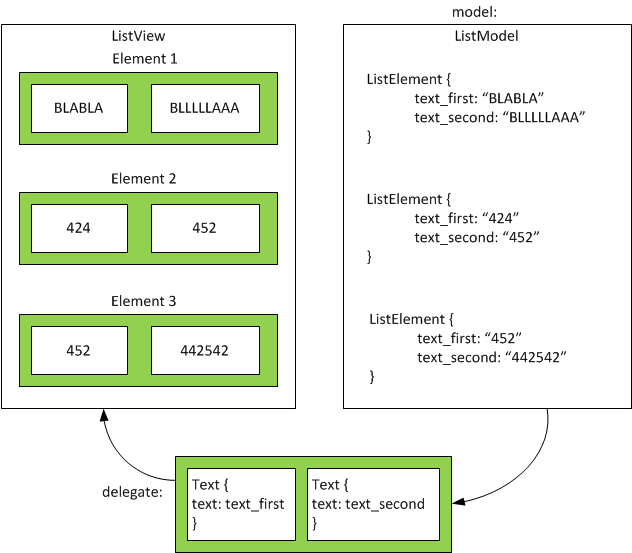
Working with the ListView in QML is a fairly common aspect in the development of Android applications, since many applications have in their functional building lists of data, records, settings, etc. It is also true in developing a Desktop applications with QML principle would be the same for both platforms.
For its consideration of the transfer of information in the list offer carefully consider the following scenario of interaction with the ListView .
The principle of view data in the ListView
ListView object has two important properties:
- delegate - which determines the appearance of a single element ListView
- model - which placed the data of each element
The transmission model can be used ListModel object that contains the data for each item in the list. The data assigned to variables that have been assigned to certain properties of the objects in the delegate. In the figure below has two delegate objects Text, text properties which the variables text_first and text_second assigned. These variables determine which will be substituted data from each ListElement in ListModel . As can be seen from the figure, each ListElement has two properties, the name of which is identical to the variables that are assigned to the delegate. In fact, these variables are roles, which put a value of ListModel . So we get ListView with text fields, which are filled with the data that have been made in each ListElement in ListModel .

Work with TextInput
Data will be input into the field TextInput and transmitted into the ListView as a new element. That is, after the data are entered in the TextInput , add a new item in the ListView writing data to it, which are recorded in the TextInput . The event, which will start the transfer of data from the TextInput in the ListView will be pressing the Enter key or click on the special button Button, in which the handler is also added code to add the item to the data of the TextInput in a ListView .
main.qml
- import QtQuick 2.5
- import QtQuick.Controls 1.4
- import QtQuick.Layouts 1.1
- ApplicationWindow {
- visible: true
- width: 640
- height: 480
- title: qsTr("Hello World")
- RowLayout {
- id: rowLayout
- anchors.top: parent.top
- anchors.left: parent.left
- anchors.right: parent.right
- anchors.margins: 5
- height: 30
- spacing: 5
- z:2 /* location level layers of elements.
- * Element with z = 2 is located higher than the element with z = 1
- */
- Rectangle {
- Layout.fillWidth: true
- Layout.fillHeight: true
- color: "white"
- TextInput {
- id: textInput
- anchors.fill: parent
- horizontalAlignment: Text.AlignHCenter
- verticalAlignment: Text.AlignVCenter
- /* By pressing the Enter key share it with any of the TextInput element in ListView
- * */
- Keys.onPressed: {
- // 16777220 - Enter the key code
- if(event.key === 16777220){
- listModel.append({ textList: textInput.text })
- }
- }
- }
- }
- /* Button, clicking on which the information is transferred from textInput element in ListView
- * */
- Button {
- id: button
- text: qsTr("Add")
- Layout.fillHeight: true
- onClicked: {
- listModel.append({ textList: textInput.text })
- }
- }
- }
- // The list, which is added with the data elements from TextInput
- ListView {
- id: listView
- anchors.top: rowLayout.bottom
- anchors.left: parent.left
- anchors.right: parent.right
- anchors.bottom: parent.bottom
- anchors.margins: 5
- z: 1
- delegate: Text {
- anchors.left: parent.left
- anchors.right: parent.right
- height: 50
- horizontalAlignment: Text.AlignHCenter
- verticalAlignment: Text.AlignVCenter
- text: textList // The role of the property text, which will be transmitted data
- }
- // Model for submission of data in a ListView
- model: ListModel {
- id: listModel
- }
- }
- }
Conclusion
The algorithm works with a ListView and TextInput valid for other objects instead of TextInput, such as Button, etc.
Retrieving data from objects that are located in ListElement in ListView with buttons similar to the article on dynamic creation and deletion of elements in the ListView.
