So, we continue to implement the same functionality in applications for Android from two fundamentally different worlds. Namely on traditional Java and less widespread Qt QML C ++.
This time we implement the menu in ActionBar Activation. I note that ActionBar for the variant with QML will have to write independently, because there is no such element in Qt QML, but it is implemented through the ToolBar component. Since this moment was described in the lesson about Hello World , in this lesson we will not dwell on it, just take ActionBar into a separate QML file, making it a separate type of QML and adding a menu icon to it, by clicking on which we will call the menu.
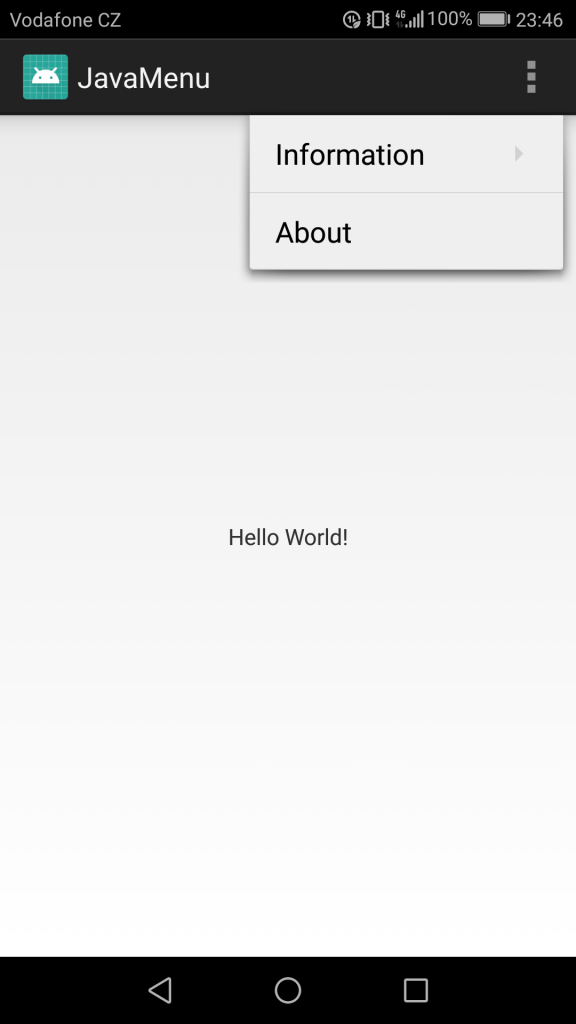
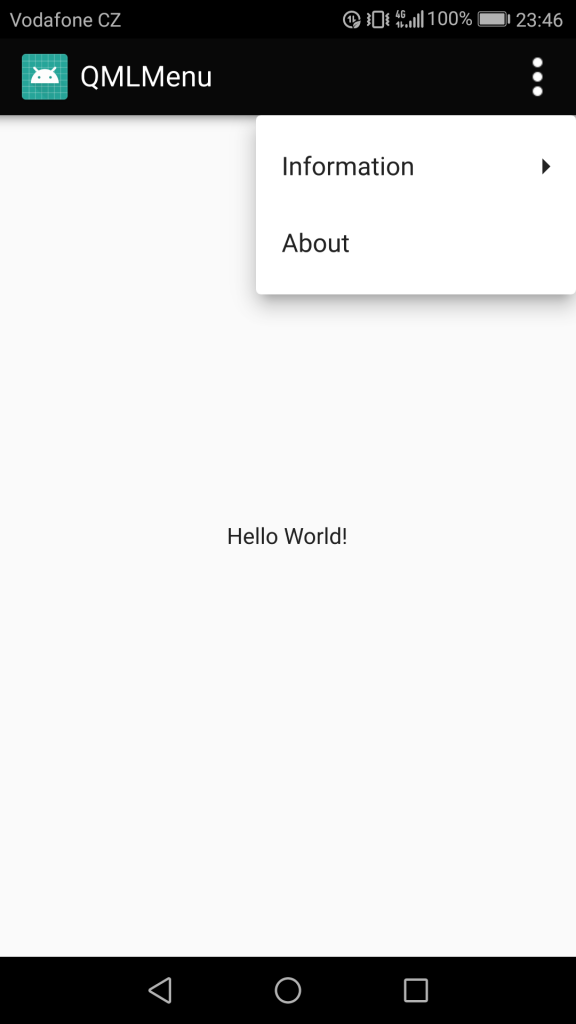
The menu will be as follows:
- Information
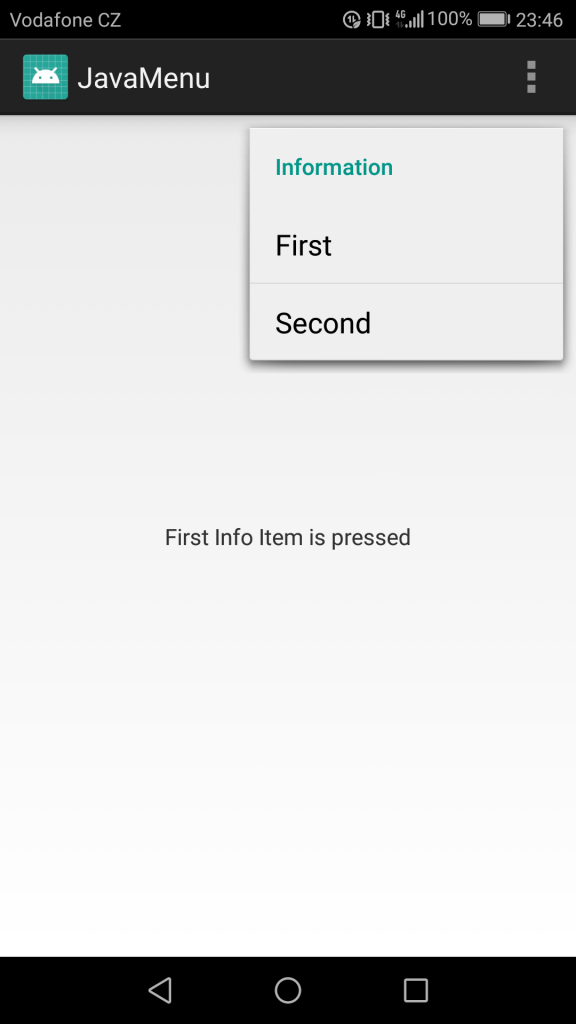
- First
- Second
- About
In the center of the application window there should be text that will be replaced by other text when you click the following menu items
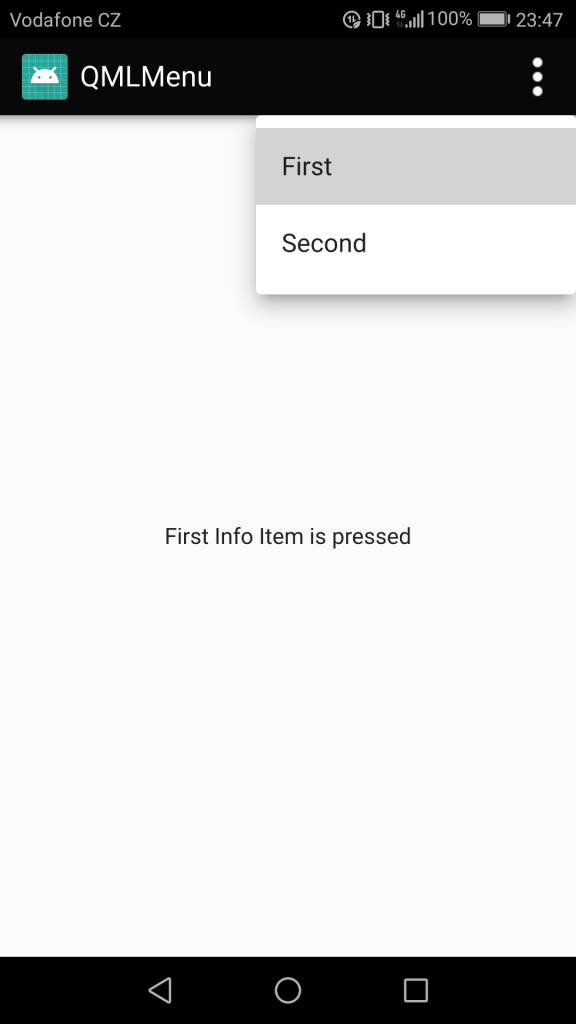
- First
- Second
- About
The appearance of the menu in Java
First level
Second level
The appearance of the menu on Qt QML
First level
Second level
Implementation on JAVA
menu.xml
To create a menu, you must create an XML file that will be located in the resource directory menu. So let's call it menu.xml
Here everything is quite simple, there is a small layout with the names of menu items, nested elements and id, which you can access to these items from Java code.
<?xml version="1.0" encoding="utf-8"?>
<menu xmlns:app="http://schemas.android.com/apk/res-auto"
    xmlns:android="http://schemas.android.com/apk/res/android">

    <item
        android:id="@+id/informationItem"
        android:title="Information">
        <menu>
            <item
                android:id="@+id/firstInfoItem"
                android:title="First" />
            <item
                android:id="@+id/secondInfoItem"
                android:title="Second" />
        </menu>
    </item>
    <item
        android:id="@+id/aboutItem"
        android:title="About" />
</menu>
activity_main.xml
Next is the layout of the most active, which in this case was created by default.
<?xml version="1.0" encoding="utf-8"?>
<android.support.constraint.ConstraintLayout xmlns:android="http://schemas.android.com/apk/res/android"
    xmlns:app="http://schemas.android.com/apk/res-auto"
    xmlns:tools="http://schemas.android.com/tools"
    android:layout_width="match_parent"
    android:layout_height="match_parent"
    tools:context="com.evileg.javamenu.MainActivity">

    <TextView
        android:id="@+id/textView"
        android:layout_width="wrap_content"
        android:layout_height="wrap_content"
        android:text="Hello World!"
        app:layout_constraintBottom_toBottomOf="parent"
        app:layout_constraintLeft_toLeftOf="parent"
        app:layout_constraintRight_toRightOf="parent"
        app:layout_constraintTop_toTopOf="parent" />

</android.support.constraint.ConstraintLayout>
MainActivity.java
And now you need to initialize all components of the menu and hang on them the handler of the click event.
package com.evileg.javamenu;

import android.app.Activity;
import android.os.Bundle;
import android.view.Menu;
import android.view.MenuItem;
import android.widget.TextView;

public class MainActivity extends Activity {

    // Define the objects of all menu items
    MenuItem aboutItem;
    MenuItem firstInfoItem;
    MenuItem secondInfoItem;

    // And also the text field, in which we will set the text
    TextView textView;

    @Override
    protected void onCreate(Bundle savedInstanceState) {
        super.onCreate(savedInstanceState);
        setContentView(R.layout.activity_main);
        textView = findViewById(R.id.textView); // find this text field in the resources
    }

    // Create menu item handlers
    @Override
    public boolean onCreateOptionsMenu(Menu menu) {
        getMenuInflater().inflate(R.menu.menu, menu);

        // Find all the items in the menu items
        aboutItem = menu.findItem(R.id.aboutItem);
        firstInfoItem = menu.findItem(R.id.firstInfoItem);
        secondInfoItem = menu.findItem(R.id.secondInfoItem);

        // Create a click handler for the menu items
        MenuItem.OnMenuItemClickListener onMenuClickListener = new MenuItem.OnMenuItemClickListener() {
            @Override
            public boolean onMenuItemClick(MenuItem item) {
                switch (item.getItemId()) {
                    case R.id.aboutItem:
                        textView.setText("About Menu Item is pressed");
                        break;
                    case R.id.firstInfoItem:
                        textView.setText("First Info Item is pressed");
                        break;
                    case R.id.secondInfoItem:
                        textView.setText("Second Info Item is pressed");
                        break;
                }
                return true;
            }
        };

        // Install this handler on the menu items
        aboutItem.setOnMenuItemClickListener(onMenuClickListener);
        firstInfoItem.setOnMenuItemClickListener(onMenuClickListener);
        secondInfoItem.setOnMenuItemClickListener(onMenuClickListener);

        return true;
    }
}
Implementation on Qt QML
ActionBar.qml
I created a special ActionBar type in a separate QML file to select it from the main main.qml file. This will separate this code from the rest of the useful part of the code, which should show the difference between the menu implementations in Java and Qt QML. And also this ActionBar will be used in the following articles.
Notice the menuClicked signal, this signal will be called in ActionBar when the user clicks a finger on MouseArea, which is responsible for clicking on our custom menu button. On this signal the menu will be opened, which is located in the file main.qml
import QtQuick 2.10
import QtQuick.Controls 2.3
import QtQuick.Controls.Material 2.1

ToolBar {
    id: root
    height: 48

    signal menuClicked() // A signal that reports a click on the menu button

    Rectangle {
        anchors.fill: parent
        color: "#080808"

        Image {
            id: ico
            height: 36
            width: 36
            anchors {
                left: parent.left
                leftMargin: 10
                top: parent.top
                topMargin: 6
            }
            source: "qrc:/icons/ic_launcher.png"
        }


        Text {
            anchors {
                verticalCenter: parent.verticalCenter
                left: ico.right
                leftMargin: 4
            }

            text: qsTr("QMLMenu")
            font.pixelSize: 18
            color: "white"
        }

        // Start implementation of the menu button
        Rectangle {
            width: height
            color: menuArea.pressed ? "#55ffffff" : "transparent"
            anchors {
                top: parent.top
                right: parent.right
                bottom: parent.bottom
            }

            Image {
                id: menuIcon
                height: 36
                width: 36
                anchors {
                    centerIn: parent
                }

                source: "qrc:/icons/menu.png"
            }

            MouseArea {
                id: menuArea
                anchors.fill: parent
                onClicked: root.menuClicked()
            }
        }
        // end of the menu button implementation
    }
}
main.qml
And here will be placed the code for what this lesson was written for. Show how to implement the menu itself.
import QtQuick 2.10
import QtQuick.Window 2.10
import QtQuick.Controls 2.3
import QtQuick.Controls.Material 2.1

ApplicationWindow {
    id: root
    visible: true
    width: 360
    height: 520
    title: qsTr("QML Menu")

    // Add ActionBar to the application window
    header: ActionBar {
        onMenuClicked: actionBarMenu.open() // Open the menu

        // Adding a menu
        Menu {
            id: actionBarMenu
            // With an indication of the location so that Menu pops up in the same place as in the version with Java
            x: root.width
            y: 48
            Menu {
                title: qsTr("Information")
                Action {
                    text: qsTr("First")
                    // Processing a click on the menu item
                    onTriggered: label.text = qsTr("First Info Item is pressed")
                }
                Action {
                    text: qsTr("Second")
                    onTriggered: label.text = qsTr("Second Info Item is pressed")
                }
            }
            Action {
                text: qsTr("About")
                onTriggered: label.text = qsTr("About Menu Item is pressed")
            }
        }
    }

    Label {
        id: label
        anchors.centerIn: parent
        text: qsTr("Hello World!")
        font.pixelSize: 14
    }
}
Conclusion
Of course, there is some difference in the implementation of the default menu for Java and for Qt QML, for example, the presence of a submenu header. Theoretically, in QML, this can be implemented with the help of an empty Action that will have a title, will be slightly customized and will not do anything when clicking, but is it necessary?

Добрый день.
Как в такое меню добавить картинку и просто лэйблы с текстом?
И скажите пожалуйста как связаны ActionBar.qml и main.qml?
Превый файл скопировал, в другой qml вставил этот код, но меню не появляется
Вот так работает
У объектов MenuItem есть свойства iconName и iconSource. В iconSource можно добавить иконку из ресурсов в проекте. Можете воспользоваться этим свойством и тогда у вас будут в пунктах меню и иконки и текст.