- 1. Java
- 2. Qt QML
- 1. QMLButtons.pro
- 2. main.cpp
- 3. main.qml
After we got acquainted with Hello World from the Java world and Qt QML under Android, I suggest writing an application that will have two buttons and by clicking on these buttons it will change the text in a small text field. Applications should look the same, but not 100 percent identical. If desired, this can be achieved, but in this example is not necessary.
In both cases, Material Design will be used.
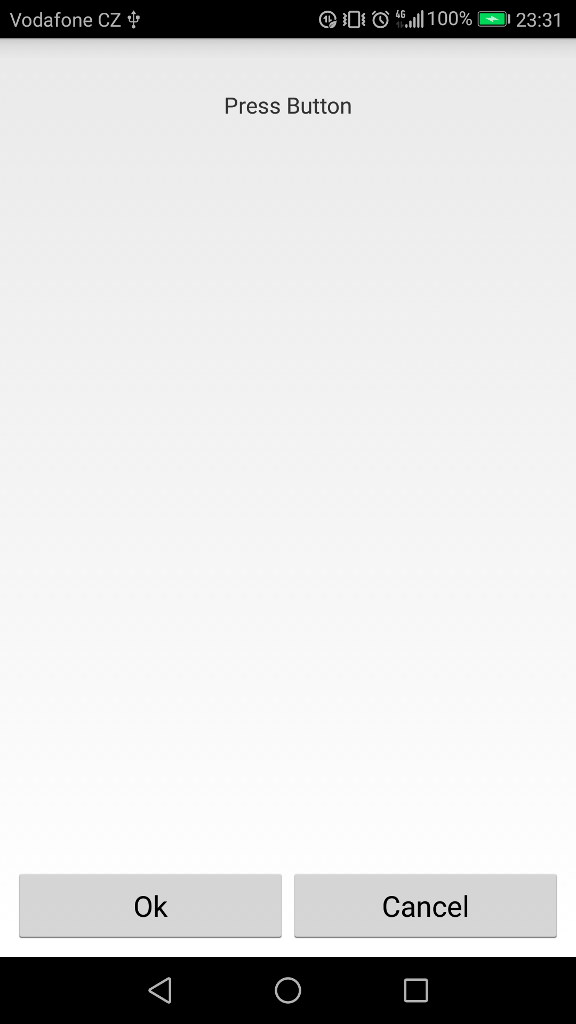
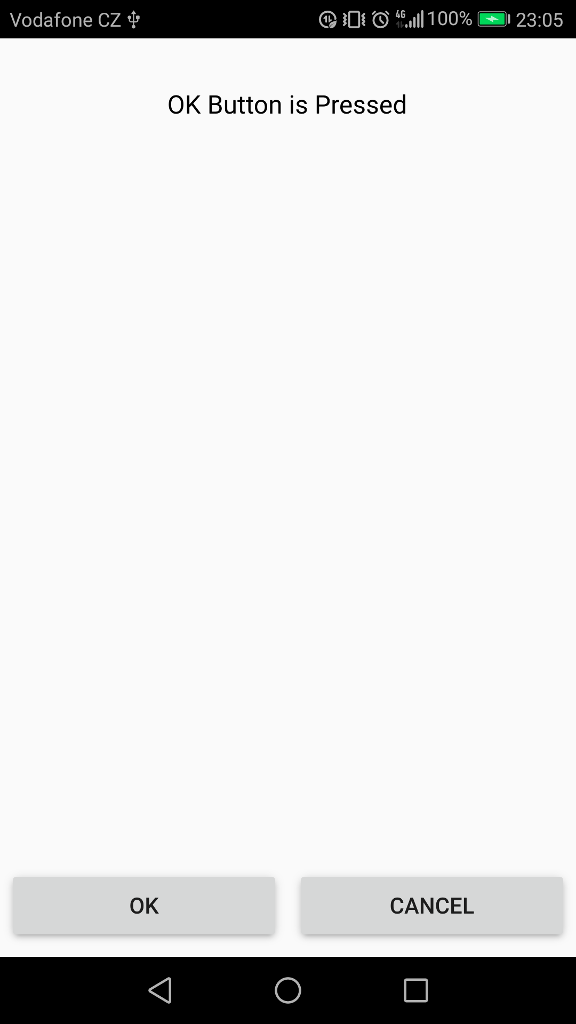
Before looking at the program code, let's look at the appearance of both applications.
An application that is written in Java

And now an application that is written in Qt QML

You can see that the result is the same, and at the same time you can see some visual differences. To be honest, the Material Design option that is used in Qt QML is more like to me than the one used in Java by default.
And now let's proceed to studying the code of our two applications.
Java
I disabled the ToolBar, because the information on it was given in the Hello World example, but in this case it will not be necessary for us to compare the code.
activity_main.xml
The file is the layout of our main activity. To put both buttons on the bottom of the screen, you had to use Layout in a horizontal orientation, which is remarkable, in QML you do not need this kind of layout for buttons in this example. Since QML uses anchors that are similar in principle to the layout_constraint properties, but in my opinion are somewhat more flexible.
- <?xml version="1.0" encoding="utf-8"?>
- <android.support.constraint.ConstraintLayout xmlns:android="http://schemas.android.com/apk/res/android"
- xmlns:app="http://schemas.android.com/apk/res-auto"
- xmlns:tools="http://schemas.android.com/tools"
- android:layout_width="match_parent"
- android:layout_height="match_parent"
- tools:context="com.evileg.javabuttons.MainActivity">
- <TextView
- android:id="@+id/textView1"
- android:layout_width="wrap_content"
- android:layout_height="wrap_content"
- android:layout_marginTop="32dp"
- android:text="Press Button"
- app:layout_constraintEnd_toEndOf="parent"
- app:layout_constraintHorizontal_bias="0.5"
- app:layout_constraintStart_toStartOf="parent"
- app:layout_constraintTop_toTopOf="parent" />
- <LinearLayout
- android:layout_width="match_parent"
- android:layout_height="wrap_content"
- android:layout_marginBottom="8dp"
- android:layout_marginEnd="8dp"
- android:layout_marginStart="8dp"
- android:orientation="horizontal"
- android:gravity="center_horizontal"
- android:weightSum="2"
- app:layout_constraintBottom_toBottomOf="parent"
- app:layout_constraintEnd_toEndOf="parent"
- app:layout_constraintStart_toStartOf="parent">
- <Button
- android:id="@+id/OkButton"
- android:layout_width="0dp"
- android:layout_height="wrap_content"
- android:text="Ok"
- android:layout_weight="1"/>
- <Button
- android:id="@+id/Cancelbutton"
- android:layout_width="0dp"
- android:layout_height="wrap_content"
- android:text="Cancel"
- android:layout_weight="1"/>
- </LinearLayout>
- </android.support.constraint.ConstraintLayout>
MainActivity.java
And now let's go on to write the code for handling keystrokes in Java. In fact, it all boils down to the fact that we need to find the id of the buttons and the text box, hover clicks on the buttons on them and add the functionality of setting the text in this text field.
- package com.evileg.javabuttons;
- import android.app.Activity;
- import android.os.Bundle;
- import android.view.View;
- import android.view.Window;
- import android.widget.Button;
- import android.widget.TextView;
- public class MainActivity extends Activity {
- TextView textView1;
- Button okButton;
- Button cancelButton;
- @Override
- protected void onCreate(Bundle savedInstanceState) {
- super.onCreate(savedInstanceState);
- this.requestWindowFeature(Window.FEATURE_NO_TITLE);
- setContentView(R.layout.activity_main);
- // Find the View items
- textView1 = findViewById(R.id.textView1);
- okButton = findViewById(R.id.OkButton);
- cancelButton = findViewById(R.id.Cancelbutton);
- // Create the button click handler OK
- View.OnClickListener onClickListenerOkBtn = new View.OnClickListener() {
- @Override
- public void onClick(View v) {
- textView1.setText("OK Button is pressed");
- }
- };
- // Create the handler for pressing the Cancel
- View.OnClickListener onClickListenerCancelBtn = new View.OnClickListener() {
- @Override
- public void onClick(View v) {
- textView1.setText("Cancel Button is pressed");
- }
- };
- // Install the click handlers on the buttons
- okButton.setOnClickListener(onClickListenerOkBtn);
- cancelButton.setOnClickListener(onClickListenerCancelBtn);
- }
- }
Qt QML
In the project on Qt QML, I modify three files ... but do not be scared so, the modifications will not be as global as writing full-value classes and layout layout, as it was in the Java application.
QMLButtons.pro
First, enable the quickcontrols2 module support in the project file, which will enable the Material Design style.
- QT += quick quickcontrols2
main.cpp
Secondly, we include Material Design itself. To do this, add only two lines to the main function.
The first
- #include <QQuickStyle>
The second
- QQuickStyle::setStyle("Material");
We get the following code
- #include <QGuiApplication>
- #include <QQmlApplicationEngine>
- #include <QQuickStyle>
- int main(int argc, char *argv[])
- {
- QCoreApplication::setAttribute(Qt::AA_EnableHighDpiScaling);
- QGuiApplication app(argc, argv);
- QQuickStyle::setStyle("Material");
- QQmlApplicationEngine engine;
- engine.load(QUrl(QStringLiteral("qrc:/main.qml")));
- if (engine.rootObjects().isEmpty())
- return -1;
- return app.exec();
- }
Be sure to enable the Material Design support before initializing QQmlApplicationEngine , since it's C++, and here the sequence of calling methods and functions is important.
main.qml
And now let's look at how to get the same layout of the application as in Java, and at the same time immediately make the processing of the button presses, which by the way is written in this case in one line.
- import QtQuick 2.10
- import QtQuick.Window 2.10
- import QtQuick.Controls 2.3
- import QtQuick.Controls.Material 2.1
- ApplicationWindow {
- visible: true
- width: 360
- height: 520
- title: qsTr("QML Buttons")
- Text {
- id: text_1
- text: qsTr("Press Button")
- anchors {
- top: parent.top
- topMargin: 32
- horizontalCenter: parent.horizontalCenter
- }
- }
- Button {
- anchors {
- left: parent.left
- bottom: parent.bottom
- right: parent.horizontalCenter
- margins: 8
- }
- text: qsTr("Ok")
- // Обработка нажатия кнопки
- onClicked: text_1.text = qsTr("OK Button is Pressed")
- }
- Button {
- anchors {
- right: parent.right
- bottom: parent.bottom
- left: parent.horizontalCenter
- margins: 8
- }
- text: qsTr("Cancel")
- // Обработка нажатия кнопки
- onClicked: text_1.text = qsTr("Cancel Button is Pressed")
- }
- }
Already noticed that the code in this case is cleaner? And its much less. Of course, we'll get to places where Java will win, but in this example, for the moment, the QML code looks a little easier.

Здравствуйте Евгений!Просматривая уроки от разных авторов,заметил,что многие не используют QT дизайнер.Создают всё на Qml.Или мне показалось,что так лучше для разработки.Сам попробовал пользоваться дизайнером при разработке под Android-не всегда корректно отображается картинка на устройстве.
Добрый день, Слава!
На тот момент, когда лично я занялся QML, там всё было довольно криво реализовано в дизайнере, а многие вещи вовсе отсутствовали. Поэтому мне проще было сделать вёрстку вручную на QML. Тем более, что qml.ui файлы добавляют "дополнительный код", который скрывает некоторую функциональность и приходится дописывать alias и сигналы в самом ui файле, которые при дальнейшем открытии qml.ui в дизайнере могут быть удалены или переписаны. Это добавляет некоторое неудобство. Поэтому я предпочитаю писать код вручную, тем более, что он не добавляет так много вёрсточного кода обычно, как я если бы тоже самое реализовывалось на классических виджетах. С того времени, конечно, много воды утекло, и что-то возможно стало гораздо лучше, но времени разбираться в этом просто нет.
Спасибо Евгений! Я посмотрел ваши уроки по Java-Qml.Хотел найти ответ на вопрос-ориентация экрана телефона.В java если я не ошибаюсь это прописывается в манифесте
(import android.content.pm.ActivityInfo;
setRequestedOrientation(ActivityInfo.SCREEN_ORIENTATION_LANDSCAPE);или portrait
А как и где это прописывается в Qml? Или у вас есть урок,тогда посмотрю?
Добрый день.
Также в манифест пишите. Вот статья про манифест для Android
На сайте часть статей по QML находятся в разделе QML, часть в разделе Android.
Я QMLем балуюсь по большей части, так что 50/50 смогу ответить на некоторые вопросы, но можете задавать вопросы на форуме . Кроме меня там уже много опытных программистов, которые могу подсобить, если обратят внимание на вопрос.
Спасибо большое!