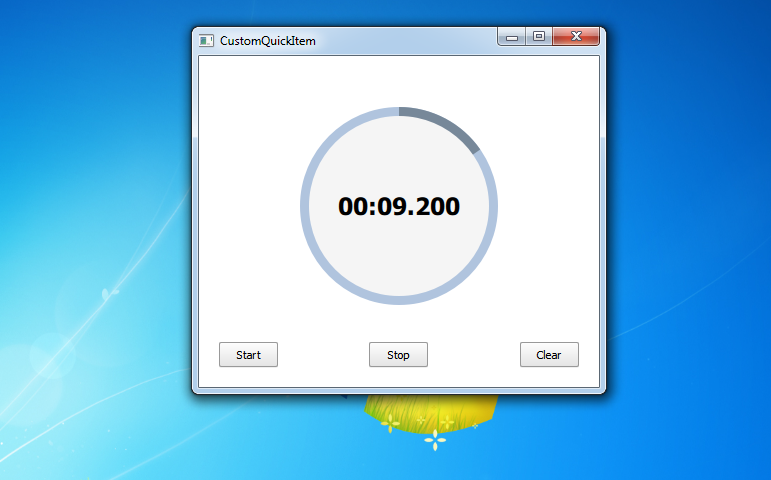
QML objects in Qt is quite wonderful, easy to work with them, but what if it becomes standard objects is not enough? Then you can make your own object to program it in C++ and QML implement the logic layer. In this tutorial, I suggest to make a small improvised timer that you can start, stop and clear, but the timer design will be developed in C ++ layer and in fact most of the work will be done in C ++.
And for the development of customized QuickItem need to use QQuickPaintedItem , which will be a timer shown in the figure below, which will be drawn like normal QGraphicsItem , but it will have a number of properties that can be controlled from QML layer.

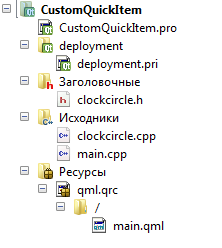
Project structure for Custom QQuickItem

- CustomQuickItem.pro - the profile of the project;
- deployment.pri - profile of deployment project under different architectures;
- clockcircle.h - header file of the project timer;
- clockcircle.cpp - source file project timer codes;
- main.cpp - the file source code of the project's main features;
- main.qml - qml file source cod e.
CustomQuickItem.pro
To register in QML layer QQuickItem customized classes, you need to connect the module quickwidgets, as is done in the file.
- TEMPLATE = app
- QT += qml quick quickwidgets
- CONFIG += c++11
- SOURCES += main.cpp \
- clockcircle.cpp
- RESOURCES += qml.qrc
- # Additional import path used to resolve QML modules in Qt Creator's code model
- QML_IMPORT_PATH =
- # Default rules for deployment.
- include(deployment.pri)
- HEADERS += \
- clockcircle.h
main.cpp
- #include <QGuiApplication>
- #include <QQmlApplicationEngine>
- #include <QQuickWidget>
- #include "clockcircle.h"
- int main(int argc, char *argv[])
- {
- QGuiApplication app(argc, argv);
- // All that is required in this file - is to register a new class (Type) for QML layer
- qmlRegisterType<ClockCircle>("ClockCircle",1,0,"ClockCircle");
- QQmlApplicationEngine engine;
- engine.load(QUrl(QStringLiteral("qrc:/main.qml")));
- return app.exec();
- }
clockCircle.h
Because this object is an object that must be accessible from QML layer, it is necessary to all of its properties to determine how the Q_PROPERTY , which will be listed all the setters and getters, respectively, signals of change in these properties. In addition there are several Q_INVOKABLE class methods that are also available from QML layer. It's clear(), start(), stop() , they will be made from the interface control timers.
Properties in timer will be several:
- m_name - Name of the object;
- m_backgroundColor - the background color of the timer;
- m_borderNonActiveColor - the background color of the rim (circular progress bar), in the unfilled state;
- m_borderActiveColor - the background color of the rim, filling the progress bar;
- m_angle - angle of rotation of the active part of the progress bar;
- m_circleTime - the current time of the timer.

- #ifndef CLOCKCIRCLE_H
- #define CLOCKCIRCLE_H
- #include <QtQuick/QQuickPaintedItem>
- #include <QColor>
- #include <QBrush>
- #include <QPen>
- #include <QPainter>
- #include <QTime>
- #include <QTimer>
- class ClockCircle : public QQuickPaintedItem
- {
- Q_OBJECT
- Q_PROPERTY(QString name READ name WRITE setName NOTIFY nameChanged)
- Q_PROPERTY(QColor backgroundColor READ backgroundColor WRITE setBackgroundColor NOTIFY backgroundColorChanged)
- Q_PROPERTY(QColor borderActiveColor READ borderActiveColor WRITE setBorderActiveColor NOTIFY borderActiveColorChanged)
- Q_PROPERTY(QColor borderNonActiveColor READ borderNonActiveColor WRITE setBorderNonActiveColor NOTIFY borderNonActiveColorChanged)
- Q_PROPERTY(qreal angle READ angle WRITE setAngle NOTIFY angleChanged)
- Q_PROPERTY(QTime circleTime READ circleTime WRITE setCircleTime NOTIFY circleTimeChanged)
- public:
- explicit ClockCircle(QQuickItem *parent = 0);
- void paint(QPainter *painter) override; // Override the method in which the object will be rendered to our
- // Methods available from QML for ...
- Q_INVOKABLE void clear(); // ... time cleaning ...
- Q_INVOKABLE void start(); // ... start the timer, ...
- Q_INVOKABLE void stop(); // ... stop the timer, ...
- QString name() const;
- QColor backgroundColor() const;
- QColor borderActiveColor() const;
- QColor borderNonActiveColor() const;
- qreal angle() const;
- QTime circleTime() const;
- public slots:
- void setName(const QString name);
- void setBackgroundColor(const QColor backgroundColor);
- void setBorderActiveColor(const QColor borderActiveColor);
- void setBorderNonActiveColor(const QColor borderNonActiveColor);
- void setAngle(const qreal angle);
- void setCircleTime(const QTime circleTime);
- signals:
- void cleared();
- void nameChanged(const QString name);
- void backgroundColorChanged(const QColor backgroundColor);
- void borderActiveColorChanged(const QColor borderActiveColor);
- void borderNonActiveColorChanged(const QColor borderNonActiveColor);
- void angleChanged(const qreal angle);
- void circleTimeChanged(const QTime circleTime);
- private:
- QString m_name; // The name of the object
- QColor m_backgroundColor; // The main background color
- QColor m_borderActiveColor; // The color of the border, filling with the progress bezel timer
- QColor m_borderNonActiveColor; // The color of the background of the border
- qreal m_angle; // The rotation angle of the pie chart type, will generate progress on the rim
- QTime m_circleTime; // Current time of the timer
- QTimer *internalTimer; // The timer, which will vary according to the time
- };
- #endif // CLOCKCIRCLE_H
clockcircle.cpp
All of the code relating to the setters and getters properties can automatically generate the context menu by right-clicking on the written Q_PROPERTY. Note only setAngle (const qreal angle), as it is modified to reset the angle of rotation.
- #include "clockcircle.h"
- ClockCircle::ClockCircle(QQuickItem *parent) :
- QQuickPaintedItem(parent),
- m_backgroundColor(Qt::white),
- m_borderActiveColor(Qt::blue),
- m_borderNonActiveColor(Qt::gray),
- m_angle(0),
- m_circleTime(QTime(0,0,0,0))
- {
- internalTimer = new QTimer(this); // Initialize timer
- /* Also connected to the timer signal from the lambda function
- * Structure lambda functions [object] (arguments) {body}
- * */
- connect(internalTimer, &QTimer::timeout, [=](){
- setAngle(angle() - 0.3); // rotation is determined in degrees.
- setCircleTime(circleTime().addMSecs(50)); // Adding to the current time of 50 milliseconds
- update(); // redraws the object
- });
- }
- void ClockCircle::paint(QPainter *painter)
- {
- // Отрисовка объекта
- QBrush brush(m_backgroundColor); // Choose a background color, ...
- QBrush brushActive(m_borderActiveColor); // active color of border, ...
- QBrush brushNonActive(m_borderNonActiveColor); // not active color of border
- painter->setPen(Qt::NoPen); // remove the outline
- painter->setRenderHints(QPainter::Antialiasing, true); // Enable antialiasing
- painter->setBrush(brushNonActive); // Draw the lowest background in a circle
- painter->drawEllipse(boundingRect().adjusted(1,1,-1,-1)); // with adjustment to the current dimensions, which
- // will be determined in QML-layer.
- // It will not be an active background rim
- // The progress bar will be formed by drawing Pie chart
- painter->setBrush(brushActive); // Draw rim active in the background, depending on the angle of rotation
- painter->drawPie(boundingRect().adjusted(1,1,-1,-1), // to fit to the size of the layer in QML
- 90*16, // The starting point
- m_angle*16); // the angle of rotation, which is necessary to render the object
- painter->setBrush(brush); // the basic background of the timer, which overlap on top
- painter->drawEllipse(boundingRect().adjusted(10,10,-10,-10)); // Border (aka the progress bar) will be formed
- }
- void ClockCircle::clear()
- {
- setCircleTime(QTime(0,0,0,0)); // Clean up time
- setAngle(0); // Expose turn to zero
- update(); // update object
- emit cleared(); // Emits a clear signal
- }
- void ClockCircle::start()
- {
- internalTimer->start(50); // Start the timer in increments of 50 ms
- }
- void ClockCircle::stop()
- {
- internalTimer->stop(); // stops the timer
- }
- QString ClockCircle::name() const
- {
- return m_name;
- }
- QColor ClockCircle::backgroundColor() const
- {
- return m_backgroundColor;
- }
- QColor ClockCircle::borderActiveColor() const
- {
- return m_borderActiveColor;
- }
- QColor ClockCircle::borderNonActiveColor() const
- {
- return m_borderNonActiveColor;
- }
- qreal ClockCircle::angle() const
- {
- return m_angle;
- }
- QTime ClockCircle::circleTime() const
- {
- return m_circleTime;
- }
- void ClockCircle::setName(const QString name)
- {
- if (m_name == name)
- return;
- m_name = name;
- emit nameChanged(name);
- }
- void ClockCircle::setBackgroundColor(const QColor backgroundColor)
- {
- if (m_backgroundColor == backgroundColor)
- return;
- m_backgroundColor = backgroundColor;
- emit backgroundColorChanged(backgroundColor);
- }
- void ClockCircle::setBorderActiveColor(const QColor borderActiveColor)
- {
- if (m_borderActiveColor == borderActiveColor)
- return;
- m_borderActiveColor = borderActiveColor;
- emit borderActiveColorChanged(borderActiveColor);
- }
- void ClockCircle::setBorderNonActiveColor(const QColor borderNonActiveColor)
- {
- if (m_borderNonActiveColor == borderNonActiveColor)
- return;
- m_borderNonActiveColor = borderNonActiveColor;
- emit borderNonActiveColorChanged(borderNonActiveColor);
- }
- void ClockCircle::setAngle(const qreal angle)
- {
- if (m_angle == angle)
- return;
- m_angle = angle;
- /* This addition is made to reset the rotation when the timer 60 seconds
- * */
- if(m_angle <= -360) m_angle = 0;
- emit angleChanged(m_angle);
- }
- void ClockCircle::setCircleTime(const QTime circleTime)
- {
- if (m_circleTime == circleTime)
- return;
- m_circleTime = circleTime;
- emit circleTimeChanged(circleTime);
- }
main.qml
And now it remains only to add a new object in QML layer, set it up and see the result. In this case, there will be three buttons that will drive Q_INVOKABLE timer methods, and will be installed in our time the timer while it is based on the work of the signals and slots .
- import QtQuick 2.6
- import QtQuick.Window 2.2
- import QtQuick.Controls 1.4
- import QtQml 2.2
- // Once an object is registered in the C ++ layer, it must be connected in QML
- import ClockCircle 1.0
- Window {
- visible: true
- width: 400
- height: 400
- ClockCircle {
- id: clockCircle
- // Set its positioning and dimensions
- anchors.top: parent.top
- anchors.topMargin: 50
- anchors.horizontalCenter: parent.horizontalCenter
- width: 200
- height: 200
- // Determine the properties that Q_PROPERTY
- name: "clock"
- backgroundColor: "whiteSmoke"
- borderActiveColor: "LightSlateGray"
- borderNonActiveColor: "LightSteelBlue"
- // Add the text that will be put up timer
- Text {
- id: textTimer
- anchors.centerIn: parent
- font.bold: true
- font.pixelSize: 24
- }
- // If you change the time, put the time on the timer
- onCircleTimeChanged: {
- textTimer.text = Qt.formatTime(circleTime, "mm:ss.zzz")
- }
- }
- Button {
- id: start
- text: "Start"
- onClicked: clockCircle.start(); // Start timer
- anchors {
- left: parent.left
- leftMargin: 20
- bottom: parent.bottom
- bottomMargin: 20
- }
- }
- Button {
- id: stop
- text: "Stop"
- onClicked: clockCircle.stop(); // Stop timer
- anchors {
- horizontalCenter: parent.horizontalCenter
- bottom: parent.bottom
- bottomMargin: 20
- }
- }
- Button {
- id: clear
- text: "Clear"
- onClicked: clockCircle.clear(); // clean timer
- anchors {
- right: parent.right
- rightMargin: 20
- bottom: parent.bottom
- bottomMargin: 20
- }
- }
- }
Video
Download software tutorial code - CustomQuickItem

Полгода назад искал как сделать такой объект, делал на QML - первое знакомство с ним было, по вашему "QML-004". А тут вот на блюдечке все готово) Попробуем потом переделать как в вашем 032 уроке, сравним кто шустрее.
Самый шустрый будет как раз в уроке 032. Там же OpenGL!!!
Когда на работе стояла такая задача, я сначала реализовал в этом уроке 024 по QML, но понял, что при большом количестве объектов ой как плохо CPU тянет, в итоге разобрался с OpenGL и всё стало работать с пол пинка. Реально быстрее отрисовывает. Всё-таки CPU не должен графикой заниматься ))