From this article we begin to explore the Qt graphic libraries, to be exact, QGraphicsScene. This class provides the functionality to manage a large number of 2D objects. QGraphicsScene set to QGraphicsView.
We describe the features that need to be implemented in our application:
- Adding a graphic scene in QGraphicsView.
- Rendering the graphics objects on the two stage via lines, namely a rectangle and a square.
- Dynamic resizing of graphic scenes, depending on changes QGraphicsView sizes.
- Dynamically changing objects on the graphic scene, depending on the size of the graphic scene.
Project Structure for QGraphicsScene

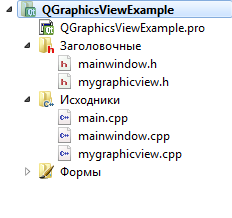
Project Structure for QGraphicsScene By the project structure "Default" added another class MyGraphicView .
The fact is that for the convenience of working with QGraphicsScene it was decided to create a class that inherits from QGraphicsView already inside to operate graphical scene and its objects.
mainwindow.ui
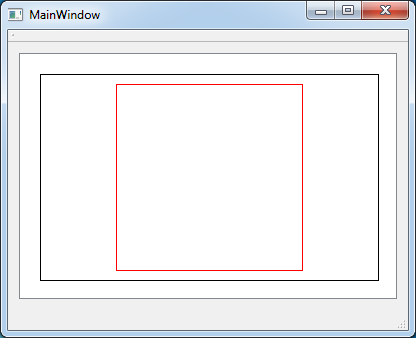
The appearance of the application consists of a main window and GridLayout, spans across all of this window. As a result of the lessons of the application will look as follows:

The appearance of the application with QGraphicsScene ## mainwindow.h
Everything that we do in this file is MyGraphicsView connect the header file.
- #ifndef MAINWINDOW_H
- #define MAINWINDOW_H
- #include <QMainWindow>
- #include <mygraphicview.h>
- namespace Ui {
- class MainWindow;
- }
- class MainWindow : public QMainWindow
- {
- Q_OBJECT
- public:
- explicit MainWindow(QWidget *parent = 0);
- ~MainWindow();
- private:
- Ui::MainWindow *ui;
- MyGraphicView *myPicture;
- };
- #endif // MAINWINDOW_H
mainwindow.cpp
This file is also unremarkable. Initialize the widget and add it GridLayout window.
- #include "mainwindow.h"
- #include "ui_mainwindow.h"
- MainWindow::MainWindow(QWidget *parent) :
- QMainWindow(parent),
- ui(new Ui::MainWindow)
- {
- ui->setupUi(this);
- /* Initialize a widget with graphics */
- myPicture = new MyGraphicView();
- /* and add it to a layer */
- ui->graphicLayout->addWidget(myPicture);
- }
- MainWindow::~MainWindow()
- {
- delete ui;
- }
mygraphicview.h
And now the most interesting. Work directly with a graphic scene in which we otrisuem two new objects, which will have to be redrawn when resizing the application window, and respectively of the widget.
For dynamic redrawing the graphic scenes, as well as the creation of the main window, the parameters width and height of the window shall be established immediately, but after a full draw, so to draw the widget's contents will require some delay in time to get the correct width and widget height, which will contained QGraphicsScene. For this we use a QTimer class, overflow which will cause the slot, which will already be content rendering graphics scenes and adjusting its size.
- #ifndef MYGRAPHICVIEW_H
- #define MYGRAPHICVIEW_H
- #include <QWidget>
- #include <QGraphicsView>
- #include <QGraphicsScene>
- #include <QGraphicsItemGroup>
- #include <QTimer>
- // Extend the class QGraphicsView
- class MyGraphicView : public QGraphicsView
- {
- Q_OBJECT
- public:
- explicit MyGraphicView(QWidget *parent = 0);
- ~MyGraphicView();
- signals:
- private slots:
- void slotAlarmTimer(); /* slot timer overflow handler there will be repainting the widget
- * */
- private:
- QGraphicsScene *scene;
- QGraphicsItemGroup *group_1;
- QGraphicsItemGroup *group_2;
- /* Timer for delayed rendering.
- * The fact is that when you create a window and the widget
- * needs some time to parent layer turned to take
- * from him adequate width and height settings
- * */
- QTimer *timer;
- private:
- void resizeEvent(QResizeEvent *event);
- void deleteItemsFromGroup(QGraphicsItemGroup *group_1);
- };
- #endif // MYGRAPHICVIEW_H
mygraphicview.cpp
To redraw the objects in QGraphicsScene these same objects will need to be removed, so for the convenience of the elements of these objects will be grouped, and will write a method to remove all elements of the group. This is useful if you need to redraw the object only one of several, which consists of several elements.
- #include "mygraphicview.h"
- MyGraphicView::MyGraphicView(QWidget *parent)
- : QGraphicsView(parent)
- {
- this->setHorizontalScrollBarPolicy(Qt::ScrollBarAlwaysOff); // Disable scroll horizontally
- this->setVerticalScrollBarPolicy(Qt::ScrollBarAlwaysOff); // Disable scroll vertically
- this->setAlignment(Qt::AlignCenter); // Make the contents of binding to the center
- this->setSizePolicy(QSizePolicy::Expanding, QSizePolicy::Expanding); // Stretch the widget content
- this->setMinimumHeight(100);
- this->setMinimumWidth(100);
- scene = new QGraphicsScene(); // Initialize the scene to render
- this->setScene(scene); // Set the scene in a widget
- group_1 = new QGraphicsItemGroup(); // Initialize the first group of elements
- group_2 = new QGraphicsItemGroup(); // Initialize the elements of the second group
- scene->addItem(group_1); // Add the first group into the scene
- scene->addItem(group_2); // Add the second group into the scene
- timer = new QTimer(); // Initialize Timer
- timer->setSingleShot(true);
- connect(timer, SIGNAL(timeout()), this, SLOT(slotAlarmTimer()));
- timer->start(50);
- }
- MyGraphicView::~MyGraphicView()
- {
- }
- void MyGraphicView::slotAlarmTimer()
- {
- /* We remove all items from the stage if they are facing a new rendering
- * */
- this->deleteItemsFromGroup(group_1);
- this->deleteItemsFromGroup(group_2);
- int width = this->width();
- int height = this->height();
- /* Set the stage size to size the widget.
- * The first coordinate - it is the top left corner,
- * and the second - is the lower right corner
- * */
- scene->setSceneRect(0,0,width,height);
- /* Getting started drawing random pictures
- * */
- QPen penBlack(Qt::black);
- QPen penRed(Qt::red);
- /* Draw a black rectangle
- * */
- group_1->addToGroup(scene->addLine(20,20, width - 20, 20, penBlack));
- group_1->addToGroup(scene->addLine(width - 20, 20, width - 20, height -20, penBlack));
- group_1->addToGroup(scene->addLine(width - 20, height -20, 20, height -20, penBlack));
- group_1->addToGroup(scene->addLine(20, height -20, 20, 20, penBlack));
- /* Draw a red rectangle
- * */
- int sideOfSquare = (height > width) ? (width - 60) : (height - 60);
- int centerOfWidget_X = width/2;
- int centerOfWidget_Y = height/2;
- group_2->addToGroup(scene->addLine(centerOfWidget_X - (sideOfSquare/2),
- centerOfWidget_Y - (sideOfSquare/2),
- centerOfWidget_X + (sideOfSquare/2),
- centerOfWidget_Y - (sideOfSquare/2),
- penRed));
- group_2->addToGroup(scene->addLine(centerOfWidget_X + (sideOfSquare/2),
- centerOfWidget_Y - (sideOfSquare/2),
- centerOfWidget_X + (sideOfSquare/2),
- centerOfWidget_Y + (sideOfSquare/2),
- penRed));
- group_2->addToGroup(scene->addLine(centerOfWidget_X + (sideOfSquare/2),
- centerOfWidget_Y + (sideOfSquare/2),
- centerOfWidget_X - (sideOfSquare/2),
- centerOfWidget_Y + (sideOfSquare/2),
- penRed));
- group_2->addToGroup(scene->addLine(centerOfWidget_X - (sideOfSquare/2),
- centerOfWidget_Y + (sideOfSquare/2),
- centerOfWidget_X - (sideOfSquare/2),
- centerOfWidget_Y - (sideOfSquare/2),
- penRed));
- }
- /* This method catches widget resize event
- * */
- void MyGraphicView::resizeEvent(QResizeEvent *event)
- {
- timer->start(50); // As soon as we start the timer event has occurred to render
- QGraphicsView::resizeEvent(event); //Run event the parent class
- }
- /* Method for removing all the elements from the group
- * */
- void MyGraphicView::deleteItemsFromGroup(QGraphicsItemGroup *group)
- {
- /* Loop through all the elements of the scene,
- * and if they belong to the group, passed into the method, then delete them
- * */
- foreach( QGraphicsItem *item, scene->items(group->boundingRect())) {
- if(item->group() == group ) {
- delete item;
- }
- }
- }
Result
The result of the application shown in the following video since 5:27. Up to this point in the video present explanation of the project.

Добрый день, Евгений! Спасибо за ваши уроки и за ваш исходный код к ним. Только небольшой вопрос - а где исходный код главной функции main()? без нее ничего не запускается. Напишите, пожалуйста, ответ, ну или, исходный код функции main(). Заранее спасибо.
Добрый день, Doug.
Я обычно прикладываю код функции main тогда, когда она отличается от файла в проекте созданном по умолчанию.
Например здесь, используется класс mainwindow для окна приложения. Он будет выглядеть так, если создадите в Qt Creator приложение на Qt, у которого базовым классом будет класс QMainWindow.
Спасибо, Евгений!! А файл main.cpp во всех других уроках останется таким же? ( я имею ввиду уроки, где вы рассказываете о работе с 2d и QGraphicsScene ? ... и, если есть какие-то изменения, не могли бы вы тоже добавить в другие уроки файл main.cpp c главной функцией main()? Еще раз спасибо.
Там может быть разница в том, что класс окна может быть Widget вместо MainWindow . Но это должно быть очевидно из класса главного окна приложения. Поэтому просто вместо MainWindow пишите Widget . Код этой функции приводится в том случае, если он отличается от кода по умолчанию при создании нового проекта.
Понял. Хорошо.Спасибо. Удачи Вам!
Добрый день! Можно такой вопрос - как организовать перемещение / поворот фигур ПРАВОЙ кнопкой мыши? И как сделать, так чтобы фигуру в фигуре (например, квадрат в треугольнике), можно было перемещать / вращать как единое целое (монолит)? Спасибо.
Что касается перемещения, то можно организовать либо как сделано в этой статье
Либо можно воспользоваться флагами:
Флаги применяются непосредственно к QGraphicsItem . Можно сразу в конструкторе настраивать.
Что касается поворота объектов, то встроенными средствами Qt это не реализуется, в том смысле, что там нет волшебного флага наподобие ItemIsMovable , который просто возьмёт и включит данную возможность. Я как-то реализовывал подобное в одном тестовом задании, но нужно искать исходники. Там много строчек написано. Поэтому ответить сходу затрудняюсь.
P/S/ Этот ваш последний вопрос имеет косвенное отношение к статье, поэтому не могли бы Вы задавать такие вопросы сразу на форуме ? Чтобы была уже отдельная ветка обсуждения.
Спасибо, Евгений за Ваш такой оперативный ответ. Не знал, что есть форум. Спасибо за ссылку.
Благодарю за уроки!
Сделал вроде бы всё как написано, но при изменении размеров окна не происходит изменения размеров виджета, и соответственно геометрических фигур. В чём причина, подскажите.
Кстати, можно сделать подключение сигнала к слоту в новом синтаксисе:
Нашёл ответ на просторах интернета:
В Дизайнере ПКМ по MainWindow: Компоновка - Скомпоновать по сетке.
Нужно писать о таких простых, но совсем не очевидных для новичка вещах.
ЗЫ: увидел у вас 24-ый урок про сигналы и слоты, так что вторая часть предыдущего комментария также снимается ))
Добрый день!
О всех очевидных вещах не напишешь. Молодца, что нашли решение самостоятельно.
Евгений, добрый день!
Взял код отсюда. Приделал graphicLayout. Всё, заработало, спасибо.
Я уже не помню какая там проблема была.
В статье написано, что таймер сработает один раз. Но это не так. Было бы хорошо добавить
После инициализации таймера.
Прямо так не написано.
Хотя соглашусь, что в качестве улучшения вызов данного метода здесь к месту.
Где вызывается наш метод resizeEvent() ?
Он вызывается в очереди событий в рамках обработки событий взаимодействия с окном. Это всё крутится под капотом Qt. У виджетов есть методы Event, они вызываются в зависимости от срабатывания событий. Если хотите знать, где конкретно, то лезьте в исходники Qt.
Спасибо большое! Разобрался.
В файле "mainwindow.cpp" есть строчка:
ui->graphicLayout->addWidget(myPicture);
Возникает вопрос: что такое "graphicLayout"? Где/Как его найти/создать?
upd
Уже разобрался. Т.к. работаю с C++ всего пару часов, не сразу понял, что это просто объект QGridLayout.
Объект был создан через графический дизайнер. ui создаётся в графическом дизайнере.