Polymorphism is one of the paradigms of OOP (Object Oriented Programming). Polymorphism implements the ability to provide base-class properties and methods, the implementation of which is not known for future classes that inherit from this class. That is the base class in this case, has all the necessary methods for the realization of tasks, but the specific implementation of certain methods is assigned to the descendants of the classes. And, as a rule, it is an abstract base class, then there are no objects on it.
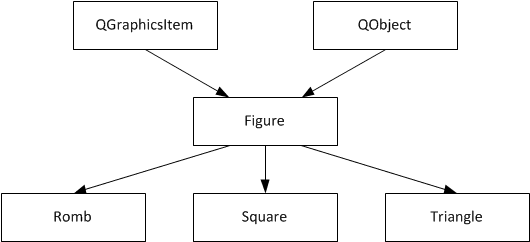
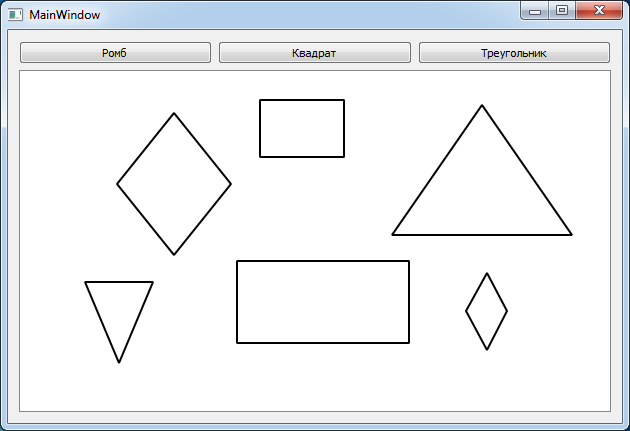
For example, it is necessary to implement the program in which it is possible to draw a few geometric shapes with the mouse on the graphic scene , choosing the current figures with the buttons in the application. To do this, you can create several classes, each of which will implement all the necessary functionality, and actually duplicated in each class most of the code, making it more difficult and confusing design. Alternatively, you can create one base class, eg, Figure , which is inherited from QGraphicsItem , and implement all the basic functionality in this class, and then create three classes that will inherit from this class, but to implement them only a method of drawing the figure itself: Romb , Square , Triangle .
In the following figure shows the inheritance logic for the base class Figure. Applied as multiple inheritance class Figure for the implementation work with signals and slots .

Project structure - the example of polymorphism
- PaintFigure.pro - the profile of the project;
- mainwindow.h - header file of the main application window;
- mainwindow.cpp - file source code of the main application window;
- paintscene.h - header graphic scene;
- paintscene.cpp - file source graphic scene;
- figure.h - header file of the base class of figures;
- figure.cpp - source code file class figures;
- romb.h - header file class Rhombus;
- romb.cpp - file source Rhombus class;
- square.h - header file class Square / Rectangle;
- square.cpp - source code file class Square / Rectangle;
- triangle.h - Triangle class header file;
- triangle.cpp - class source code file Triangle;
- mainwindow.ui - form the main application window.
mainwindow.ui - PaintFigure.pro - main.cpp
Create in the form designer the application's main window. A PaintFigure.pro files and main.cpp are created by default and do not undergo modifications.

mainwindow.h
The header of the main application window, you must declare the customized graphics scene PaintScene, which will be responsible for drawing geometric figures. Also we redefine resizeEvent () method, which will recalculate the size of the graphic scenes, depending on the size of the application window. This is a purely cosmetic point.
- #ifndef MAINWINDOW_H
- #define MAINWINDOW_H
- #include <QMainWindow>
- #include <QTimer>
- #include <QResizeEvent>
- #include "paintscene.h"
- namespace Ui {
- class MainWindow;
- }
- class MainWindow : public QMainWindow
- {
- Q_OBJECT
- public:
- explicit MainWindow(QWidget *parent = 0);
- ~MainWindow();
- private:
- Ui::MainWindow *ui;
- PaintScene *scene;
- QTimer *timer;
- private:
- void resizeEvent(QResizeEvent * event);
- private slots:
- void slotTimer();
- void on_pushButton_clicked(); // Enable drawing Romb
- void on_pushButton_2_clicked(); // Enable drawing Square
- void on_pushButton_3_clicked(); // Enable drawing Triangle
- };
- #endif // MAINWINDOW_H
mainwindow.cpp
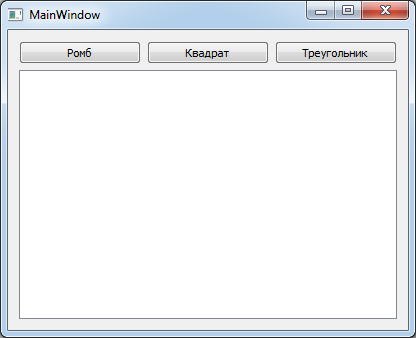
There are three buttons in the main application window, by pressing which we will install the required type of shape to draw with the mouse. slot to handle window resizing is also present on a signal from a timer to repaint.
- #include "mainwindow.h"
- #include "ui_mainwindow.h"
- MainWindow::MainWindow(QWidget *parent) :
- QMainWindow(parent),
- ui(new Ui::MainWindow)
- {
- ui->setupUi(this);
- scene = new PaintScene();
- ui->graphicsView->setScene(scene);
- ui->graphicsView->setRenderHint(QPainter::Antialiasing);
- ui->graphicsView->setVerticalScrollBarPolicy(Qt::ScrollBarAlwaysOff);
- ui->graphicsView->setHorizontalScrollBarPolicy(Qt::ScrollBarAlwaysOff);
- timer = new QTimer();
- connect(timer, &QTimer::timeout, this, &MainWindow::slotTimer);
- timer->start(100);
- }
- MainWindow::~MainWindow()
- {
- delete ui;
- }
- void MainWindow::slotTimer()
- {
- timer->stop();
- scene->setSceneRect(0,0, ui->graphicsView->width() - 20, ui->graphicsView->height() - 20);
- }
- void MainWindow::resizeEvent(QResizeEvent *event)
- {
- timer->start(100);
- QMainWindow::resizeEvent(event);
- }
- // Ромб
- void MainWindow::on_pushButton_clicked()
- {
- scene->setTypeFigure(PaintScene::RombType);
- }
- // Квадрат
- void MainWindow::on_pushButton_2_clicked()
- {
- scene->setTypeFigure(PaintScene::SquareType);
- }
- // Треугольник
- void MainWindow::on_pushButton_3_clicked()
- {
- scene->setTypeFigure(PaintScene::TriangleType);
- }
paintscene.h
The header of Custom graphic scene. In this stage there Q_PROPERTY property, which is responsible for storing this type of shape to draw. The list of types is defined using enum FigureTypes. Also present classified tempFigure object that is an instance of the class Figure. This class is the base in accordance with the paradigm of polymorphism, so it is used for temporary storage of the figure, which is drawn on the graphic scene, as all the basic methods for setting the size of the figure with the mouse implemented in the base class Figure.
Also override the events from the mouse. The method mousePressEvent created geometric figure to draw, and in the method mouseMoveEvent redraws shapes, depending on the position of the mouse as long as the mouse button is released.
- #ifndef PAINTSCENE_H
- #define PAINTSCENE_H
- #include <QGraphicsScene>
- #include <QGraphicsSceneMouseEvent>
- #include "figure.h"
- class PaintScene : public QGraphicsScene
- {
- Q_OBJECT
- // The property of this type is used figures
- Q_PROPERTY(int typeFigure
- READ typeFigure WRITE setTypeFigure
- NOTIFY typeFigureChanged)
- public:
- explicit PaintScene(QObject *parent = 0);
- ~PaintScene();
- int typeFigure() const; // Return this type
- void setTypeFigure(const int type); // Setting this type
- // Listing the types of figures
- enum FigureTypes {
- SquareType,
- RombType,
- TriangleType
- };
- signals:
- void typeFigureChanged();
- private:
- /* The object for the temporary storage of the rendered shapes.
- * It is an object of the base class for all three types of figures in the example
- * */
- Figure *tempFigure;
- int m_typeFigure;
- private:
- // To draw using the mouse events
- void mousePressEvent(QGraphicsSceneMouseEvent * event);
- void mouseMoveEvent(QGraphicsSceneMouseEvent *event);
- };
- #endif // PAINTSCENE_H
paintscene.cpp
- #include "paintscene.h"
- #include "romb.h"
- #include "triangle.h"
- #include "square.h"
- PaintScene::PaintScene(QObject *parent) : QGraphicsScene(parent)
- {
- }
- PaintScene::~PaintScene()
- {
- }
- int PaintScene::typeFigure() const
- {
- return m_typeFigure;
- }
- void PaintScene::setTypeFigure(const int type)
- {
- m_typeFigure = type;
- }
- void PaintScene::mouseMoveEvent(QGraphicsSceneMouseEvent *event)
- {
- /* Set the final coordinates of the mouse can draw into the current figure
- * */
- tempFigure->setEndPoint(event->scenePos());
- /* Update the contents of the scene, you need to remove artifacts when drawing shapes
- * */
- this->update(QRectF(0,0,this->width(), this->height()));
- }
- /* Once clicked the mouse button, create the figure of one of the three types
- * and put it on the stage, keeping a pointer to it in the variable tempFigure
- * */
- void PaintScene::mousePressEvent(QGraphicsSceneMouseEvent *event)
- {
- switch (m_typeFigure) {
- case SquareType: {
- Square *item = new Square(event->scenePos());
- item->setPos(event->pos());
- tempFigure = item;
- break;
- }
- case RombType: {
- Romb *item = new Romb(event->scenePos());
- item->setPos(event->pos());
- tempFigure = item;
- break;
- }
- case TriangleType: {
- Triangle *item = new Triangle(event->scenePos());
- item->setPos(event->pos());
- tempFigure = item;
- break;
- }
- default:{
- Square *item = new Square(event->scenePos());
- item->setPos(event->pos());
- tempFigure = item;
- break;
- }
- }
- this->addItem(tempFigure);
- }
figure.h
Base class header file to create geometric shapes. It provides the basic functionality for determining the boundaries of the geometrical figure drawing, regardless of which shape is drawn, that provides a polymorphism. two points are used to draw: start and end. Drawing starts from the starting point, and it does not change its position, but the end point is the coordinate of the opposite corner of the rectangular area in which the figure is drawn. Depending on these points are redrawn and all other key points of the figures, and thus the boundaries of these figures.
- #ifndef FIGURE_H
- #define FIGURE_H
- #include <QObject>
- #include <QGraphicsItem>
- #include <QDebug>
- class Figure : public QObject, public QGraphicsItem
- {
- Q_OBJECT
- // The property is the starting point, which draw the shape
- Q_PROPERTY(QPointF startPoint
- READ startPoint WRITE setStartPoint
- NOTIFY pointChanged)
- // The property is the endpoint, which draw the shape
- Q_PROPERTY(QPointF endPoint
- READ endPoint WRITE setEndPoint
- NOTIFY pointChanged)
- public:
- explicit Figure(QPointF point, QObject *parent = 0);
- ~Figure();
- QPointF startPoint() const;
- QPointF endPoint() const;
- void setStartPoint(const QPointF point);
- void setEndPoint(const QPointF point);
- signals:
- void pointChanged();
- private:
- QPointF m_startPoint;
- QPointF m_endPoint;
- QRectF boundingRect() const;
- public slots:
- void updateRomb();
- };
- #endif // FIGURE_H
figure.cpp
- #include "figure.h"
- #include <QPainter>
- Figure::Figure(QPointF point, QObject *parent) :
- QObject(parent), QGraphicsItem()
- {
- // Set starting coordinate to draw shapes
- this->setStartPoint(mapFromScene(point));
- this->setEndPoint(mapFromScene(point));
- /* Connect the signal change of coordinates to a slot running the update contents of the object.
- * The signal and slot are present in the base class
- * */
- connect(this, &Figure::pointChanged, this, &Figure::updateRomb);
- }
- Figure::~Figure()
- {
- }
- QRectF Figure::boundingRect() const
- {
- /* Return the area in which lies the figure.
- * Upgradable region depends on the starting point and drawing from the endpoint
- * */
- return QRectF((endPoint().x() > startPoint().x() ? startPoint().x() : endPoint().x()) - 5,
- (endPoint().y() > startPoint().y() ? startPoint().y() : endPoint().y()) - 5,
- qAbs(endPoint().x() - startPoint().x()) + 10,
- qAbs(endPoint().y() - startPoint().y()) + 10);
- }
- void Figure::updateRomb()
- {
- // Call update area in which the figure lies
- this->update((endPoint().x() > startPoint().x() ? startPoint().x() : endPoint().x()) - 5,
- (endPoint().y() > startPoint().y() ? startPoint().y() : endPoint().y()) - 5,
- qAbs(endPoint().x() - startPoint().x()) + 10,
- qAbs(endPoint().y() - startPoint().y()) + 10);
- }
- void Figure::setStartPoint(const QPointF point)
- {
- m_startPoint = mapFromScene(point);
- emit pointChanged();
- }
- void Figure::setEndPoint(const QPointF point)
- {
- m_endPoint = mapFromScene(point);
- emit pointChanged();
- }
- QPointF Figure::startPoint() const
- {
- return m_startPoint;
- }
- QPointF Figure::endPoint() const
- {
- return m_endPoint;
- }
romb.h
All you need to do in the class header file required us figure - it is inherited from a base class Figure and override paint() method, which is inherited from the parent class Figure, that is, from QGraphicsItem. In this method, the rendering logic will be implemented this geometric figure.
- #ifndef ROMB_H
- #define ROMB_H
- #include <QObject>
- #include <QGraphicsItem>
- #include "figure.h"
- /* Inheriting from a class Figure, which implements common functionality for all figures
- * */
- class Romb : public Figure
- {
- Q_OBJECT
- public:
- explicit Romb(QPointF point, QObject *parent = 0);
- ~Romb();
- private:
- // For Romb realize itself only drawing
- void paint(QPainter *painter, const QStyleOptionGraphicsItem *option, QWidget *widget);
- };
- #endif // ROMB_H
romb.cpp
- #include "romb.h"
- #include <QPainter>
- Romb::Romb(QPointF point, QObject *parent) :
- Figure(point,parent)
- {
- Q_UNUSED(point)
- }
- Romb::~Romb()
- {
- }
- void Romb::paint(QPainter *painter, const QStyleOptionGraphicsItem *option, QWidget *widget)
- {
- painter->setPen(QPen(Qt::black, 2));
- QPolygonF polygon;
- polygon << QPointF(startPoint().x() + (endPoint().x() > startPoint().x() ? + 1 : - 1)*
- abs((endPoint().x() - startPoint().x())/2), startPoint().y())
- << QPointF(endPoint().x(), startPoint().y() + (endPoint().y() > startPoint().y() ? + 1 : - 1)*
- abs((endPoint().y() - startPoint().y())/2))
- << QPointF(startPoint().x() + (endPoint().x() > startPoint().x() ? + 1 : - 1)*
- abs((endPoint().x() - startPoint().x())/2), endPoint().y())
- << QPointF(startPoint().x(), startPoint().y() + (endPoint().y() > startPoint().y() ? + 1 : - 1)*
- abs((endPoint().y() - startPoint().y())/2));
- painter->drawPolygon(polygon);
- Q_UNUSED(option)
- Q_UNUSED(widget)
- }
Triangle and Square classes
The data structure is similar to the class Romb , the only difference is in the logic of the implementation of figure drawing.
Result
As a result of the skillful use of Polymorphism paradigm can significantly reduce the amount of code, as well as increase the frequency reuse, especially if it means the presence of a plurality of similar objects, such as geometric shapes.
Link to the project download in zip-archive: PaintFigure


Здравствуйте!
В программировании новичок и есть пара вопросов. Буду очень благодарен за ответ.
Не совсем понимаю как:
1) реализовать подобным образом рисование эллипса(конкретно выбор точек по типу как 22-29 строка в romb.cpp);
2) выбор цвета фигур через диалоговое окно выбора цвета (присваиваю переменной Color цвет, после его выбора в QColorDialog и вместо Qt::black пишу Color, но цвет остается черным).
Добрый день!
Огромное спасибо!
Добрый день, начал только изучать Qt C++.
Здесь скорее нужно использовать стек из указателей, чтобы хранить поочерёдно добавляемые элементы. Например, QVector в конец которого будете добавлять элементы, которые были добавлены на графическую сцену.
Крутой урок! Но как только захотел добавить функцию выделение объекта ( подразумевается перемещение и изменение размера) ничего не получается . Читал что нужно включить флаги ItemIsSelected и ItemIsMovable , и сделал точно также ка к в вашем примере при перетаскивании мышью(23 урок) , но ничего не заработало.Не подскажите как это должно выглядить?
Ну не видя вашего кода, сказать, где у вас ошибка невозможно.
А что касается перетаскивания и разных манипуляций, то можете распотрошить код векторного редактора из этой статьи Qt/C++ - Урок 072. Пример векторного редактора на Qt .
Там достаточно примеров кода по интересующим вас вопросам.
А писать какие-то ещё примеры на эту тему у меня сейчас очень сильно нет времени.
Здравствуйте! Очень нужна помощь, как сделать так чтобы выбранный пользователем цвет границ фигуры применялся только к новой фигуре(которую только собираешься нарисовать), а не ко всем фигурам(уже нарисованным)? Пожалуйста помогите, никак не могу наладить
Внутри класса создайте переменную, которая будет отвечать за цвет объекта и при создании объекта устанавливайте его цвет.