- 1. Project structure
- 2. CMakeLists.txt
- 3. main.cpp
- 4. EWidget.h
- 5. EWidget.cpp
- 6. ClipScene.h
- 7. ClipScene.cpp
- 8. Conclusion
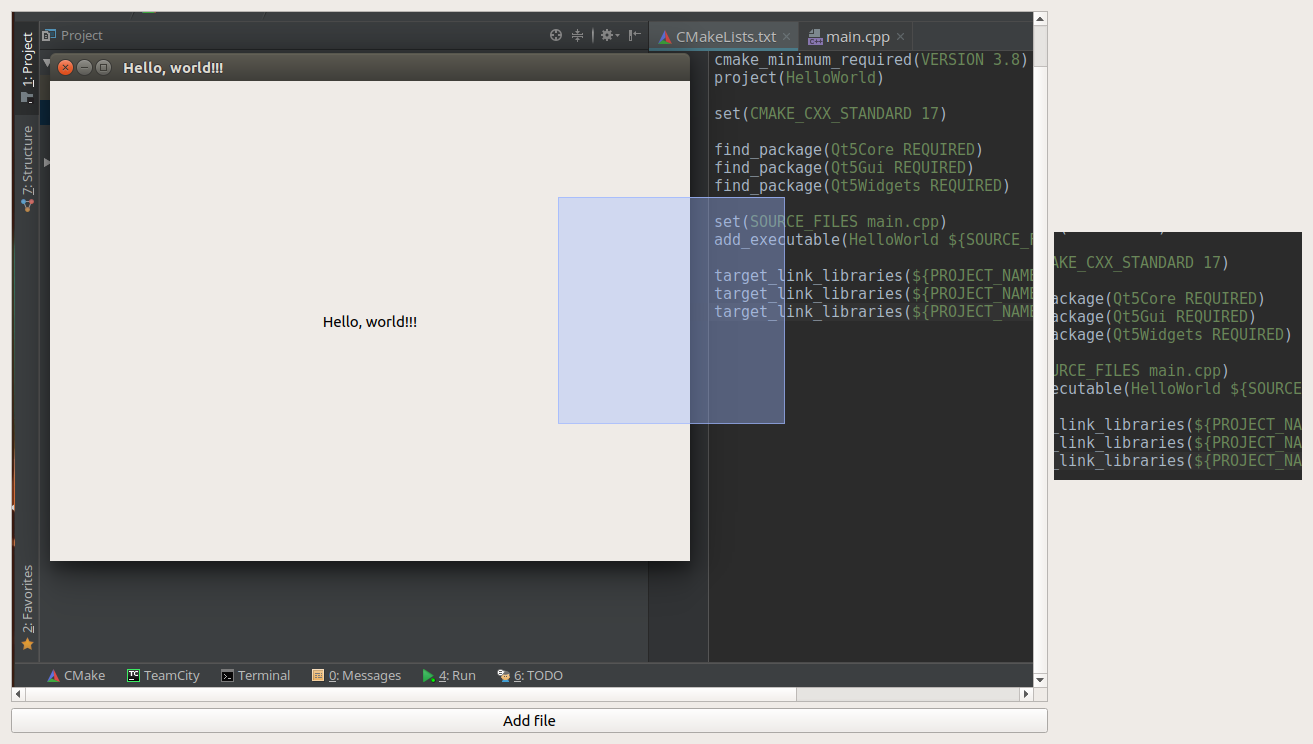
Let's write a small application that will allow you to crop the image using QGraphicsScene . In this case, the image will be cropped so that a square is obtained. That is, to make the image always square (Add this functionality to make it more interesting).
In the application, a graphic scene will be added to which an image will be added via QFileDialog . Also there will be QLabel , in which the cut out part of the image will be added. The image will be cropped using the QGraphicsRectItem object.
The cutting mechanism is as follows:
- With the left mouse click on the image, a selection box is created.
- While holding LMB scalable square.
- When releasing, we delete the selection object, cutting out part of the image from the graphic scene.
When the LMB is released, the selection options, namely QRect, will be used to cut out the desired image area.
The application will look like this:
Project structure
The project is created in the IDE CLion using the CMake build system.
- CMakeLists.txt
- main.cpp
- EWidget.h - Application window header file
- EWidget.cpp - Application window source code file
- ClipScene.h - Header file graphical scene with cut-out functionality
- ClipScene.cpp - Source file of the graphic scene
CMakeLists.txt
cmake_minimum_required(VERSION 3.8)
project(ClipImage)

set(CMAKE_CXX_STANDARD 17)
set(CMAKE_AUTOMOC ON)

find_package(Qt5Core REQUIRED)
find_package(Qt5Gui REQUIRED)
find_package(Qt5Widgets REQUIRED)

set(SOURCE_FILES main.cpp EWidget.cpp EWidget.h ClipScene.cpp ClipScene.h)
add_executable(${PROJECT_NAME} ${SOURCE_FILES})

target_link_libraries(${PROJECT_NAME} Qt5::Core Qt5::Gui Qt5::Widgets)
main.cpp
#include <QApplication>
#include "EWidget.h"


int main(int argc, char *argv[])
{
    QApplication app(argc, argv);

    EWidget widget;
    widget.show();

    return app.exec();
}
EWidget.h
In the application window, you need to create slots to add an image to the graphic scene, and to add the cropped image to the label in the application.
Widgets and Layouts are also declared here.
#pragma once

#include <QtWidgets/QWidget>

class QGridLayout;
class QPushButton;
class QGraphicsView;
class QLabel;
class ClipScene;

class EWidget : public QWidget
{
    using BaseClass = QWidget;

    Q_OBJECT

public:
    EWidget(QWidget* parent = nullptr);

private slots:
    void onAddFile();                           // Slot for adding an image to the application
    void onClippedImage(const QPixmap& pixmap); // Slot for accepting a cropped application area
private:
    QGridLayout* m_gridLayout;
    QPushButton* m_pushButton;
    QGraphicsView* m_graphicsView;
    QLabel* m_clippedLabel;         // A label in which the cropped image will be placed
    ClipScene* m_clipScene;         // The graphical scene in which the image trimming functionality is implemented
};
EWidget.cpp
#include "EWidget.h"

#include "ClipScene.h"

#include <QtWidgets/QGridLayout>
#include <QtWidgets/QPushButton>
#include <QtWidgets/QFileDialog>
#include <QtWidgets/QLabel>
#include <QtWidgets/QGraphicsView>

EWidget::EWidget(QWidget* parent) :
    BaseClass(parent)
{
    m_gridLayout = new QGridLayout(this);
    m_graphicsView = new QGraphicsView(this);
    m_gridLayout->addWidget(m_graphicsView), 0, 0;
    m_pushButton = new QPushButton("Add file", this);
    m_clippedLabel = new QLabel(this);
    m_gridLayout->addWidget(m_clippedLabel, 0, 1);
    m_gridLayout->addWidget(m_pushButton, 1, 0);
    m_clipScene = new ClipScene(this);
    m_graphicsView->setScene(m_clipScene);

    // Connections to slots for adding an image to an application and for adding an image to a label
    connect(m_pushButton, &QPushButton::clicked, this, &EWidget::onAddFile);
    connect(m_clipScene, &ClipScene::clippedImage, this, &EWidget::onClippedImage);

    resize(640, 480);
}

void EWidget::onAddFile()
{
    QString imagePath = QFileDialog::getOpenFileName(this, "Open Image File", QString(), tr("Image (*.png *.jpg)"));
    m_clipScene->setImage(imagePath);
}

void EWidget::onClippedImage(const QPixmap& pixmap)
{
    m_clippedLabel->setPixmap(pixmap);
}
ClipScene.h
The size of the selection area will be changed from the point of pressing the LMB. To do this, you need to override the following methods:
- mousePressEvent
- mouseMoveEvent
- mouseReleaseEvent
Also, we will declare a variable that will report that at the moment the motion of the mouse LMB is clamped.
In addition, we declare pointers to QGrpaphicsRectItem , which will play the selection role, and QGraphicsPixmapItem , which is the image from which the region is cut.
#pragma once


#include <QtWidgets/QGraphicsScene>

class QGraphicsSceneMouseEvent;
class QGraphicsPixmapItem;
class QGraphicsRectItem;

class ClipScene : public QGraphicsScene
{
    Q_OBJECT
    Q_PROPERTY(QPointF previousPosition READ previousPosition WRITE setPreviousPosition NOTIFY previousPositionChanged)

public:
    ClipScene(QObject* parent);
    QPointF previousPosition() const;
    // Method for replacing an image in QGraphicsScene
    void setImage(const QString& filePath);

signals:
    void previousPositionChanged(const QPointF previousPosition);
    void clippedImage(const QPixmap& pixmap);  // A signal that transmits the cut out area to the application window to install it in the label

public slots:
    void setPreviousPosition(const QPointF previousPosition);

protected:
    virtual void mousePressEvent(QGraphicsSceneMouseEvent* event) override;
    virtual void mouseMoveEvent(QGraphicsSceneMouseEvent* event) override;
    virtual void mouseReleaseEvent(QGraphicsSceneMouseEvent* event) override;


private:
    QGraphicsRectItem* m_selection          {nullptr};
    QGraphicsPixmapItem* m_currentImageItem {nullptr};
    QPointF m_previousPosition;
    bool m_leftMouseButtonPressed           {false};
};
ClipScene.cpp
#include "ClipScene.h"

#include <QGraphicsSceneMouseEvent>
#include <QtWidgets/QGraphicsPixmapItem>
#include <QtWidgets/QGraphicsRectItem>


ClipScene::ClipScene(QObject* parent) : QGraphicsScene(parent)
{

}

void ClipScene::mousePressEvent(QGraphicsSceneMouseEvent* event)
{
    if (event->button() & Qt::LeftButton)
    {
        // With the left mouse button pressed, remember the position
        m_leftMouseButtonPressed = true;
        setPreviousPosition(event->scenePos());

        // Create a selection square
        m_selection = new QGraphicsRectItem();
        m_selection->setBrush(QBrush(QColor(158,182,255,96)));
        m_selection->setPen(QPen(QColor(158,182,255,200),1));
        // Add it to the graphic scene
        addItem(m_selection);
    }

    QGraphicsScene::mousePressEvent(event);
}

void ClipScene::mouseMoveEvent(QGraphicsSceneMouseEvent* event)
{
    if (m_leftMouseButtonPressed)
    {
        // Form the selection area when moving with the mouse while pressing the LMB
        auto dx = event->scenePos().x() - m_previousPosition.x();
        auto dy = event->scenePos().y() - m_previousPosition.y();
        auto resultDelta = qMax(qAbs(dx), qAbs(dy));
        m_selection->setRect((dx > 0) ? m_previousPosition.x() : m_previousPosition.x() - resultDelta,
                           (dy > 0) ? m_previousPosition.y() : m_previousPosition.y() - resultDelta,
                           qAbs(resultDelta),
                           qAbs(resultDelta));
    }
    QGraphicsScene::mouseMoveEvent(event);
}

void ClipScene::mouseReleaseEvent(QGraphicsSceneMouseEvent* event)
{
    if (event->button() & Qt::LeftButton)
    {
        m_leftMouseButtonPressed = false;

        // When releasing the LMB, we form the cut off area
        QRect selectionRect = m_selection->boundingRect().toRect();
        clippedImage(m_currentImageItem->pixmap().copy(selectionRect));
        delete m_selection;
    }
    QGraphicsScene::mouseReleaseEvent(event);
}

void ClipScene::setPreviousPosition(const QPointF previousPosition)
{
    if (m_previousPosition == previousPosition)
        return;

    m_previousPosition = previousPosition;
    emit previousPositionChanged(m_previousPosition);
}

QPointF ClipScene::previousPosition() const
{
    return m_previousPosition;
}

void ClipScene::setImage(const QString& filePath)
{
    if (m_currentImageItem)
    {
        this->removeItem(m_currentImageItem);
    }
    m_currentImageItem = new QGraphicsPixmapItem(QPixmap(filePath));
    addItem(m_currentImageItem);
}

Как избежать падения программы при doubleclick? Она падает потому что при двойном щелчке все равно после двойного щелчка срабатывает mouseReleaseEvent в котором при удалении несуществующей области происходит краш, пробовал завернуть в try catch все равно падает. Не создавать же в doubleClick-е пустую область для этого случая, это же костыль...
Попробуйте делать accept события.
не понял, где это делать?
ничего не поменялось, так же падает
если падает внутри сцены, то проверяйте на nullptr, если пустой указатель, то ничего не делайте.
проверяю перед удалением
все равно падает, не падает если только убрать удаление области
Чтобы не падала на doubleclick-e надо после проверки и удаления обнулять m_selection
вот так работает правильно
Я бы так сделал
Иначе у вас будут утечки памяти
Вообще, наверное здесь имеет смысл smart pointer использовать, например std::uтique_ptr здесь подошёл бы
спасибо, до smart pointer еще не дошел )