Customization ListView is common in developing applications for Android OS. ListView (List) allows you to display the same type of information in your application, for example, show the products with prices and features, if you develop applications for online sales. At the same time being in fact a routine operation, however, some questions for novice developers deliver a lot of inconvenience. Some of these inconveniences and questions will be discussed in this article.
Project structure
This lesson is proposed to establish a small list with the flags of countries, called the currencies of these countries, and the abbreviation of the country.
Total is used to create a list of four countries: Russia, South Africa, Singapore, Turkey. Flags of these countries are in the drawable folder. Also there is an xml file to create backgrounds ListViewi flags. For storing names and abbreviations used strings.xml file. Also, a separate xml file to create the ListView layout.
In the Project there are three classes:
- MainActivity
- MyListAdapter - which is responsible for the transmission of data in the form of a list item
- DataFlags - class that is designed to facilitate the transfer of data to the adapter ListView
The formation of layout the ListView
To create a nice looking list in this lesson, the following files:
- list_item.xml
- flag.xml
- listview_selector.xml
- styles.xml
listview.xml
This file is a markup directly listview item.
<?xml version="1.0" encoding="utf-8"?>
<LinearLayout xmlns:android="http://schemas.android.com/apk/res/android"
    android:layout_width="match_parent"
    android:layout_height="48dp"
    android:background="@drawable/listview_selector"
    android:orientation="horizontal">

    <ImageView
        android:id="@+id/flagImage"
        android:src="@drawable/flag_russian"
        android:layout_width="48dp"
        android:layout_height="40dp"
        android:layout_marginStart="16dp"
        android:layout_marginLeft="16dp"
        android:layout_marginRight="8dp"
        android:layout_marginEnd="8dp"
        android:contentDescription="@string/flag"
        android:background="@drawable/flag"
        android:layout_gravity="center_vertical"/>

    <TextView
        android:id="@+id/abbreviation"
        android:layout_width="52dp"
        android:layout_height="30dp"
        android:textColor="@color/black"
        android:textSize="24sp"
        android:text="@string/russianRUB"
        android:layout_marginRight="6dp"
        android:layout_marginEnd="6dp"
        android:layout_gravity="center_vertical"/>

    <TextView
        android:id="@+id/name"
        android:layout_width="match_parent"
        android:layout_height="wrap_content"
        android:textColor="@color/black"
        android:textSize="14sp"
        android:text="@string/russian"
        android:gravity="center"
        android:layout_gravity="center"
        android:singleLine="false"/>

</LinearLayout>
flag.xml
This file is created for backgroud ImageView, which will display the flag. The edges of the substrate are rounded to the flag. And also set the color of the substrate.
<?xml version="1.0" encoding="UTF-8"?>
<shape xmlns:android="http://schemas.android.com/apk/res/android">

    <solid android:color="@color/blue_grey_100" />

    <padding
        android:bottom="2dp"
        android:top="2dp"
        android:right="2dp"
        android:left="2dp"/>

    <corners android:radius="4dp"/>

</shape>
listview_selector.xml
This marking is used as a background for the ListView. This file is customizable background color of the item in normal mode and when you click on a list item.
<?xml version="1.0" encoding="utf-8"?>
<selector xmlns:android="http://schemas.android.com/apk/res/android">
    <item
        android:state_selected="false"
        android:state_pressed="false"
        android:drawable="@color/white" />

    <item
        android:state_pressed="true"
        android:drawable="@color/blue_grey_100" />

    <item
        android:state_selected="true"
        android:state_pressed="false"
        android:drawable="@color/blue_grey_100" />

</selector>
styles.xml
File styles familiar to anyone who has been developing for Android. In this case, it is used only for storing color codes used in this example.
<resources>

    <!-- Base application theme. -->
    <style name="AppTheme" parent="Theme.AppCompat.Light.DarkActionBar">
    </style>

    <color name="white">#ffffff</color>
    <color name="black">#000000</color>
    <color name="blue_grey_100">#CFD8DC</color>

</resources>
activity_main.xml
Layout main Activiti to house our custom ListView
<RelativeLayout xmlns:android="http://schemas.android.com/apk/res/android"
    xmlns:tools="http://schemas.android.com/tools"
    android:layout_width="match_parent"
    android:layout_height="match_parent"
    android:background="@color/white"
    android:paddingLeft="@dimen/activity_horizontal_margin"
    android:paddingRight="@dimen/activity_horizontal_margin"
    android:paddingTop="@dimen/activity_vertical_margin"
    android:paddingBottom="@dimen/activity_vertical_margin" tools:context=".MainActivity">

    <ListView
        android:layout_width="match_parent"
        android:layout_height="match_parent"
        android:id="@+id/listViews" />

</RelativeLayout>
The main project class - MainActivity.java
In this class, is launched basic Activiti project, which will display a custom ListView. Data in ListView transmitted via ArrayList list in which the objects are marked for each data element. The grouping of data for the ListView is produced by a separate class, which forms a data structure in which to store a flag image ID, ID names line the country's currency, as well as the ID string of abbreviations for the currencies.
In fact in this class made standard setting ListView, with the difference that does not use a conventional List, and an ArrayList, which is transferred to an object, and not a single line.
package ru.evileg.listview;

import android.os.Bundle;
import android.support.v7.app.ActionBarActivity;
import android.view.Menu;
import android.view.MenuItem;
import android.widget.ListView;

import java.util.ArrayList;


public class MainActivity extends ActionBarActivity {

    @Override
    protected void onCreate(Bundle savedInstanceState) {
        super.onCreate(savedInstanceState);
        setContentView(R.layout.activity_main);

        // Find the ListView in the markup Activiti
        ListView listView = (ListView) this.findViewById(R.id.listViews);

        // Create a ListView, in which the data for the list will be stored
        ArrayList<DataFlags> list = new ArrayList<>();
        list.clear();

        /* We fill List data. In this case, the data is transferred to the object that holds the id,
         * the flags indicating the resource, as well as strings,
         * which are registered names and abbreviations for the currencies of these currencies
         */
        list.add(new DataFlags(R.drawable.flag_russian, R.string.russian, R.string.russianRUB));
        list.add(new DataFlags(R.drawable.flag_africa, R.string.africa, R.string.africaZAR));
        list.add(new DataFlags(R.drawable.flag_singapore, R.string.singapore, R.string.singaporeSGD));
        list.add(new DataFlags(R.drawable.flag_turkish, R.string.turkish, R.string.turkishTRY));

        /* Create an adapter that will transfer data from the List item in the ListView and connect it directly to ListView`u
         */
        MyListAdapter myListAdaptery = new MyListAdapter(this, list);
        listView.setAdapter(myListAdaptery);
    }

    @Override
    public boolean onCreateOptionsMenu(Menu menu) {
        // Inflate the menu; this adds items to the action bar if it is present.
        getMenuInflater().inflate(R.menu.menu_main, menu);
        return true;
    }

    @Override
    public boolean onOptionsItemSelected(MenuItem item) {
        // Handle action bar item clicks here. The action bar will
        // automatically handle clicks on the Home/Up button, so long
        // as you specify a parent activity in AndroidManifest.xml.
        int id = item.getItemId();

        //noinspection SimplifiableIfStatement
        if (id == R.id.action_settings) {
            return true;
        }

        return super.onOptionsItemSelected(item);
    }
}
All lines which are used for the ListView is stored directly in the resource file strings.xml
<resources>
    <string name="app_name">ListView</string>
    <string name="action_settings">Settings</string>

    <string name="africaZAR">ZAR</string>
    <string name="russianRUB">RUB</string>
    <string name="singaporeSGD">SGD</string>
    <string name="turkishTRY">TRY</string>

    <string name="africa">South African\nrand</string>
    <string name="russian">Russian\nrouble</string>
    <string name="singapore">Singapore\ndollar</string>
    <string name="turkish">Turkish\nlira</string>

    <string name="flag">flag</string>
</resources>
DataFlags.java
This class is used for the formation of the object, in which data is stored for ListView items. Each object serves one of the ListView items in the project. A class is a common variable, and a set of get methods to retrieve data from the object generated by this class.
package ru.evileg.listview;

/**
 * Application ListView
 * Created by EvILeg on 21.07.2015.
 */
public class DataFlags {

    private int flagID;
    private int nameID;
    private int abbreviationID;

    public DataFlags (int _flagID, int _nameID, int _abbreviationID){
        flagID = _flagID;
        nameID = _nameID;
        abbreviationID = _abbreviationID;
    }

    public int getFlagID(){
        return flagID;
    }

    public int getNameID(){
        return nameID;
    }

    public int getAbbreviationID() {
        return abbreviationID;
    }
}
MyListAdapter class
The most important class in this lesson. It is this class is used to transfer data from ArrayList to the ListView. This class extends the parent class BaseAdapter.
package ru.evileg.listview;

import android.content.Context;
import android.view.LayoutInflater;
import android.view.View;
import android.view.ViewGroup;
import android.widget.BaseAdapter;
import android.widget.ImageView;
import android.widget.TextView;

import java.util.ArrayList;

/**
 * Application ListView
 * Created by EvILeg on 21.07.2015.
 */
public class MyListAdapter extends BaseAdapter {

    /*
     * Create objects for the display appearance element and a list of object that will be work
     */
    private LayoutInflater LInflater;
    private ArrayList<DataFlags> list;

    /*
     * The class constructor. In this case, a broadcast data sheet in the adapter list,
     * which will be direct work
     */
    public MyListAdapter(Context context, ArrayList<DataFlags> data){

        list = data;
        LInflater = (LayoutInflater) context
                .getSystemService(Context.LAYOUT_INFLATER_SERVICE);
    }

    /*
     * Next come the standard methods of the parent class BaseAdapter.
     * Please read carefully the differences in the methods and classroom techniques that automatically creates Android Studio.
     * These methods should be used to work directly with us and ArrayList data structure formed by class DataFlags
     */
    @Override
    public int getCount() {
        return list.size();
    }

    @Override
    public DataFlags getItem(int position) {
        return list.get(position);
    }

    @Override
    public long getItemId(int position) {
        return position;
    }

    /*
     * The method in which the appearance of elements is formed with its filling
     */
    @Override
    public View getView(int position, View convertView, ViewGroup parent) {

        ViewHolder holder;
        View v = convertView;

        /*
         * In that case, if the form element is not created,
         * produced with the help of its creation ViewHolder and tagging of a particular element holder object
         */
        if ( v == null){
            holder = new ViewHolder();
            v = LInflater.inflate(R.layout.list_item, parent, false);
            holder.flag = (ImageView) v.findViewById(R.id.flagImage);
            holder.name = (TextView) v.findViewById(R.id.name);
            holder.abbreviation = ((TextView) v.findViewById(R.id.abbreviation));
            v.setTag(holder);
        }

        /*
         * Once all elements are defined, the correlation is performed appearance data and the specific position in ListView.
         * After that, the ArrayList data are collected for the ListView element and transmitted to the exterior element
         */
        holder = (ViewHolder) v.getTag();
        DataFlags dataFlags = getData(position);

        holder.flag.setImageResource(dataFlags.getFlagID());
        holder.name.setText(v.getResources().getString(dataFlags.getNameID()));
        holder.abbreviation.setText(v.getResources().getString(dataFlags.getAbbreviationID()));

        return v;
    }

    /*
     * A method that takes an object of the ArrayList to further work with him and transmit its data in a ListView item
     */
    DataFlags getData(int position){
        return (getItem(position));
    }

    /*
     * This data structure is needed to ensure that when scrolling through a large list of artifacts and do not arise from skipping data ListView one position to another,
     * that is achieved by tagging each element ListView
     */
    private static class ViewHolder {
        private ImageView flag;
        private TextView name;
        private TextView abbreviation;
    }
}
Using ViewHolder crucial because if you do not use this technique, you can get inappropriate behavior ListView, which will occur when uncontrolled data leap from one ListView to another position. And this will occur only in appearance, but in fact the data will remain in their places. There is a mismatch appearance ListView with its contents.
Result
If in the process of learning the lesson did not have any problems and errors, the appearance of the resulting ListView should be similar to the following:
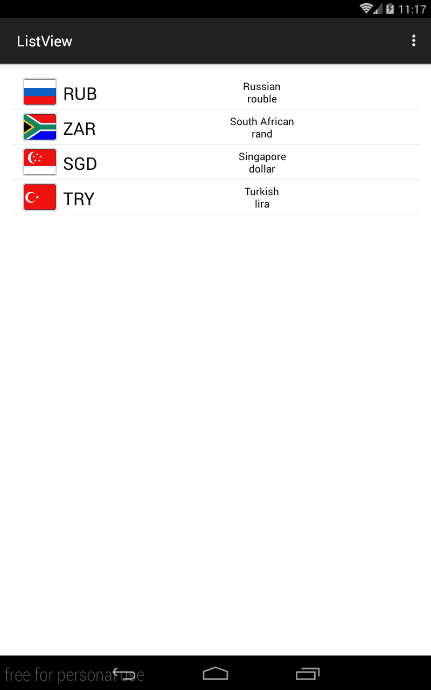
Custom ListView
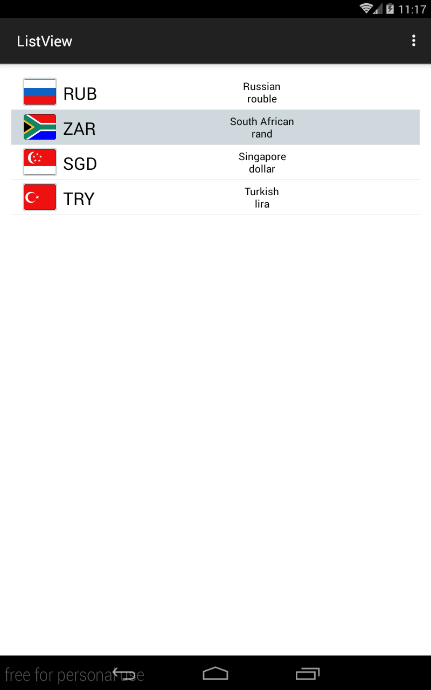
Custom ListView with pressed element

Спасибо за пример.
У меня возникает ошибка.
AndroidRuntime: FATAL EXCEPTION: main
Подскажите, пожалуйста, с чем это может быть связано?
Честно, вот в этой ошибке может быть что угодно, вплоть до того, что вы просто где-то не в том порядке код запсали.
Это просто ошибка в рантайме, для всего, что могло случиться.