Introduction
I would like to express my gratitude to Evgeny for this wonderful site and for the fact that he helps novice programmers and not only develop. I would like to ask other users to contribute to the development of this project) Thank you all)
The following steps were taken by me when I installed OpenCV for myself. I would like to emphasize that there is no FULL article on this topic on the Internet. Since when I installed it, errors came out and I had to look for answers in Runet, then from the Americans, then the devil knows who.
Lan. Go)

To install OpenCV on Qt under OS Windows, we need.
-
Download OpenCV from the official site. We get files from the archive.

-
Download CMake from the official site. We get files from the archive.

- Qt itself (at the moment I have 5.10.1 v)
-
On Drive C:\ or drive D:\ creates a folder OpenCV
3.0 In this folder (OpenCV) we drop the folder that we got from the OpenCV.zip archive.
3.1 In the same folder (OpenCV) create a folder OpneCV_bin - Run CMake
ATTENTION!!!
Pay attention to the link
C: / OpenCV / opencv / sources (This is in the folder that we unzipped after we downloaded it has this SOURCES folder!)
C:/OpenCV/opencv_bin (And this is an empty! folder that we created)

-
IMPORTANT !!!
In this list, uncheck ENABLE_PRECOMPILED_HEADERS, WHIT_IPP, WHIT_CUDA, WHIT_TBB.
In this list, put the WHIT_QT flag, change WHIT_OPENGL to Release - Click on Configuer, the installation process will go through there and it will stop. Some fields will be red and need to be changed manually.
- Установите QT_MAKE_EXECUTABLE в D: \ Qt \ 5.9 \ mingw53_32 \ bin \ qmake.exe
- Установите Qt5Concurrent_DIR в D: \ Qt \ 5.9 \ mingw53_32 \ lib \ cmake \ Qt5Concurrent
- Установите Qt5Core_DIR в D: \ Qt \ 5.9 \ mingw53_32 \ lib \ cmake \ Qt5Core
- Установите Qt5Gui_DIR в D: \ Qt \ 5.9 \ mingw53_32 \ lib \ cmake \ Qt5Gui
- Установите Qt5Test_DIR в D: \ Qt \ 5.9 \ mingw53_32 \ lib \ cmake \ Qt5Test
- Установите Qt5Widgets_DIR в D: \ Qt \ 5.9 \ mingw53_32 \ lib \ cmake \ Qt5Widgets
- Установите Qt5OpenGL_DIR в D: \ Qt \ 5.9 \ mingw53_32 \ lib \ cmake \ Qt5OpenGL
- Установите CMAKE_BUILD_TYPE для Release или RelWithDebInfo
then clicks on Config again and after the end on Generate. And that's it, close CMake.
7. Open the command line and go to the folder C:\OpenCV\opencv_bin (This is in my case) and on the command line we type
- cd с: \OpenCV\opencv_bin
- mingw32-make -j 8
- mingw32-make install
Dear friends, you can also install OpenCV on Qt under MacOS .... but you need to use the sudo make command there
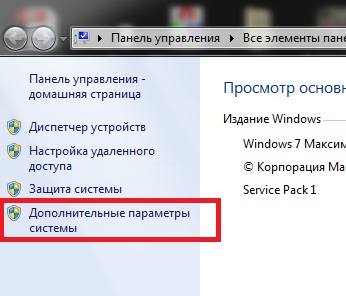
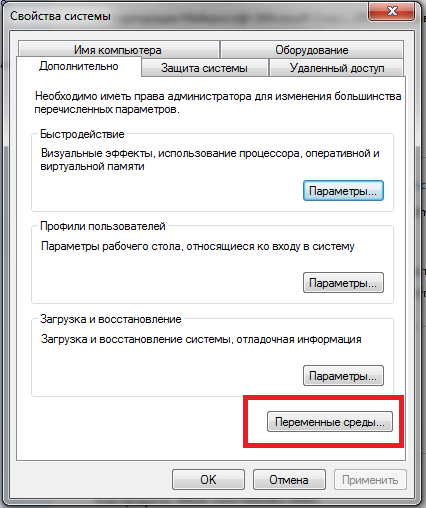
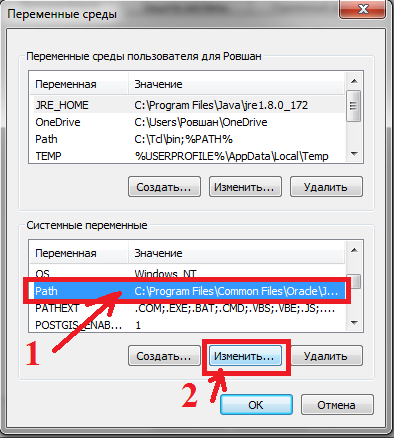
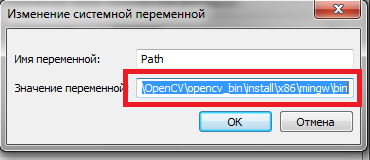
8. Then add PATH
Go to the properties of MY COMPUTER


All. We have installed everything)) Now you need to open the project in Qt and add the following links to the project
Sample code below
- # -------------------------------------------------
- #
- # Проект, созданный QtCreator 2017-03-05T12: 30: 06
- #
- # --------------------------------- ----------------
- QT + = core gui
- moreThan ( QT_MAJOR_VERSION , 4 ) : QT + = виджеты
- TARGET = opencvtest
- TEMPLATE = приложение
- # Следующий параметр определяет, что ваш компилятор генерирует предупреждения, если вы используете
- # любую функцию Qt, которая помечается как устаревшая (точные предупреждения
- # зависят от вашего компилятора). Пожалуйста, ознакомьтесь с документацией
- # устаревшего API, чтобы узнать, как отменить его код.
- ОПРЕДЕЛЕНИЯ + = QT_DEPRECATED_WARNINGS
- # Вы также можете сделать код не скомпилированным, если вы используете устаревшие API.
- # Чтобы сделать это, раскомментируйте следующую строку.
- # Вы также можете отключить устаревшие API только до определенной версии Qt.
- #DEFINES + = QT_DISABLE_DEPRECATED_BEFORE = 0x060000 # отключает все API, устаревшие до Qt 6.0.0
- ИСТОЧНИКИ + = основной . cpp \
- mainwindow . CPP
- HEADERS + = mainwindow . час
- FORMS + = mainwindow . щ
- INCLUDEPATH + = D : \ opencv \ build \ include
- LIBS + = D : \ opencv - build \ bin \ libopencv_core320 . dll
- LIBS + = D : \ opencv - build \ bin \ libopencv_highgui320 . dll
- LIBS \ libopencv_imgproc320 . dll LIBS + = D : \ opencv - + = D : \ opencv - build \ bin \ libopencv_imgcodecs320 . dll
- LIBS + = D : \ opencv - build \ bin
- build \ bin \ libopencv_features2d320 . dll
- LIBS + = D : \ opencv - build \ bin \ libopencv_calib3d320 . длл
- # более правильный вариант, как set includepath и libs для mingw
- # добавить системную переменную: OPENCV_SDK_DIR = D: / opencv / build
- # читать http: //doc.qt.io/qt-5/qmake-variable-reference.html#libs
- #INCLUDEPATH + = $$ (OPENCV_SDK_DIR) / включить
- #LIBS + = -L $$ (OPENCV_SDK_DIR) / x86 / mingw / lib \
- # -lopencv_core320 \
- # -lopencv_highgui320 \
- # -lopencv_imgcodecs320 \
- # -lopencv_imgproc320 \
- # -lopencv_features2d320 \
- # -lopencv_calib3d320
- и измените mainwindow.cpp следующим образом:
- #include "mainwindow.h"
- #include "ui_mainwindow.h"
- #include <opencv2 / core / core.hpp>
- #include <opencv2 / highgui / highgui.hpp>
- MainWindow :: MainWindow ( родитель QWidget * ) : QMainWindow ( родительский ), ui
- ( новый Ui :: MainWindow )
- {
- ui -> setupUi ( this );
- // читаем изображение
- cv :: Mat image = cv :: imread ( "f: //1.jpg" , 1 );
- // создаем окно изображения с именем «My Image»
- cv :: namedWindow ( «My Image» );
- // показать изображение в окне
- cv :: imshow ( «Мое изображение» , изображение );
- }
- MainWindow :: ~ MainWindow ()
- {
- delete ui ;
- }
Source Qt wiki
But not everything is there ... I passed these paths

Код снизу чет слетел....не знаю как подправить ....простите ребята(
Спасибо за статью. Я поправил все моменты с вёрсткой.
Спасибо за статью!
У меня возникли проблемы с CMake'ом он постоянно выдавал ошибки, нашел ролик на ютубе где пошагово показано как устанавливать эту либу. Ссылку прилагаю, надеюсь это разрешено..
(https://www.youtube.com/watch?v=7zYJFjqPklI)
Не приветствуется спам, подозрительные ссылки, сомнительные предложения и некультурное поведение ))))
В остальном всё модерируется, конечно, но без тирании.
Если есть действительно полезные материалы или статьи на других ресурсах, то для этого даже имеется раздел социальных закладок , можете добавлять там ссылки, просто пишите небольшую аннотацию о том, что находится по той ссылке. Но, конечно, все материалы проходят пост-модерацию во избежание злоупотреблений.
Ребята а что если папки "Source" в архиве opencv нет? Скачал три варианта библиотеки ни в одном нет этой папки.
Разобрался!!! Надо было не архив качать а exe файл и его уже распаковывать в нужную папку)))
Добавлю от себя: на Windows 10 x64 с MinGW 7.3.0 в CMake надо установить флаг OPENCV_ENABLE_ALLOCATOR_STATS=OFF, тогда всё скомпилится нормально.
А если на этапе консоли выдаёт ошибки?
Эту если с припиской -j 8

Эту - если простая установка
Можете подсказать, пожалуйста, что делать?