Correct programmer - it is a lazy programmer. If you can automate something, you definitely need to do this. For example, it can be run automatically with the collecting windeployqt online and offline installers, as well as the preparation of the application repository using Qt Installer Framework and black magic QMake .
In order to make the most beautiful way, it is necessary that the project has been organized by the structure of the subdirs, that is comprised of several projects. We do not need every time you build the project to create installers. Therefore, the project will be a separate installer.
But automation windeployqt leave in the main project.
Project structure
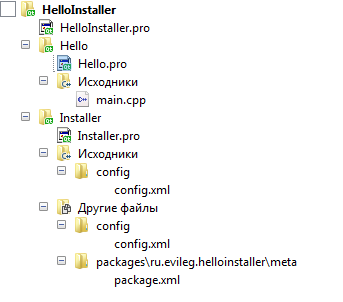
So, we have a project with two sub-projects:
- Hello.pro - application project
- Installer.pro - installer project
The main project is the most usual "Hello world", but the biggest interest is in the script QMake, which is responsible for windeployqt applications.
The second project has a minimal structure to build online and offline installers, as well as build the repository. QMake script in the profile of the project also includes the necessary information for the assembly automation installers.
Automation WinDeployQt
HelloInstaller.pro
This file is the traditional content for subdirs project.
- TEMPLATE = subdirs
- CONFIG += ordered
- SUBDIRS += \
- Hello \
- Installer
Hello.pro
In addition to the usual instructions executable assembly directories, and other output files in the project, the script is executed QMake launch windeployqt utility.
- QT += core
- QT -= gui
- CONFIG += c++11
- TARGET = Hello
- CONFIG += console
- CONFIG -= app_bundle
- TEMPLATE = app
- # Select the executable assembly directory depending on project build mode
- CONFIG(debug, debug|release) {
- DESTDIR = $$OUT_PWD/../../HelloDebug
- } else {
- DESTDIR = $$OUT_PWD/../../HelloRelease
- }
- # separate directories on the output project files
- MOC_DIR = ../common/build/moc
- RCC_DIR = ../common/build/rcc
- UI_DIR = ../common/build/ui
- unix:OBJECTS_DIR = ../common/build/o/unix
- win32:OBJECTS_DIR = ../common/build/o/win32
- macx:OBJECTS_DIR = ../common/build/o/mac
- # depending on the project's build mode
- # run win deploy the application in the target directory, that is, collect all the dll
- CONFIG(debug, debug|release) {
- QMAKE_POST_LINK = $$(QTDIR)/bin/windeployqt $$OUT_PWD/../../HelloDebug
- } else {
- QMAKE_POST_LINK = $$(QTDIR)/bin/windeployqt $$OUT_PWD/../../HelloRelease
- }
- SOURCES += main.cpp
If an assembly-executable folder is clear, then we shall understand that the same thing happens when the windeployqt.
QMAKE_POST_LINK - This directive specifies the action after completion of the project build. That is what we do after the executable file was compiled.
$$(QTDIR) - variable that contains the path to Qt assembly kit. In my case it D:\Qt\5.7\mingw53_32.
To perform windeployqt not necessarily indicate sufficient to indicate an executable file as an argument to the folder where the file is. As a result, the project completion of the assembly, it will automatically collecting the necessary dll for application , and they will be placed near the executable file.
Build installers and Repository
Build installers and online project repository is done using Qt Installer Framework, which contains in its composition utility is to build installers themselves, and for the preparation of the application repository.
To building the two utilities from this framework will be used:
- binarycreator - utility to build the installer;
- repogen - a utility to prepare online repository.
Before we deal with QMake script, examine the configuration files and the directory structure to build installers.
Directory structure
Consider the structure of the project:
- config - which is the configuration file of the installer:
- config.xml - in this file will contain information about the remote repository, version, project name, etc.
- packages - which will be in packages, which will be collected in installers, for example:
- ru.evileg.helloinstaller - directory of the first package
- meta - directory that contains installation scripts that will describe the specific functionality, such as the closing of the active instance of the application, if the application is updated, or prescribing information in the system registry.
- package.xml - the minimum version required the presence of the file, which will be described in the draft version and build date. This information is required for the formation of Updates.xml file that will be placed in the online repository.
- data - in this directory will be necessary to put the executable file and all necessary the dll, resource files, transfer files, etc. That is all that is needed to build a working application.
- ru.evileg.ecolor - as well as, for example, the directory with the contents of the second package, which is similar in structure to the previous versions.
config.xml
The file, which describes the service information about the publisher, application installation paths, and his version of the title. And also contains information about the address of the remote repository. This information will be the same as for the online installer, and for offline installer. After all, we will have among other things more and update the app, so both versions of installers looking for information about a remote repository.
- <?xml version="1.0" encoding="UTF-8"?>
- <Installer>
- <Name>Hello Installer</Name>
- <Version>1.0.0</Version>
- <Title>1.0.0 Installer</Title>
- <Publisher>EVILEG</Publisher>
- <StartMenuDir>HelloInstaller</StartMenuDir>
- <TargetDir>@RootDir@Program Files (x86)\EVILEG\HelloInstaller</TargetDir>
- <AllowSpaceInPath>true</AllowSpaceInPath>
- <RemoteRepositories>
- <Repository>
- <Url>http://www.evileg.ru/software/helloinstaller/</Url>
- </Repository>
- </RemoteRepositories>
- </Installer>
- Installer
- Name - Name of application
- Version - application version
- Title - Title installer window
- Publisher - Publisher
- StartMenuDir - It indicates a product group that owns the application in the start menu of Windows.
- TargetDir - application installation folder; @RootDir@ - root folder. In this case C:\
- AllowSpaceInPath - allow spaces in the path to the directory
- RemoteRepositories - repository list
- Repository - one of the online repository, there may be several, or they may even be replaced
- Url - repository address
package.xml
There have indicated more information about installing the application in order, that is, the existence of certain forms of windows, installation of scripts, for example, for entering information into the registry. It also adds information about the application release date, which will also be placed in Updates.xml file.
This file must be contained in each package. The installer can provide the ability to install a number of components, remember Qt installer, there are a lot of points. Accordingly, any such package is your point.
- <?xml version="1.0" encoding="UTF-8"?>
- <Package>
- <DisplayName>Hello Installer</DisplayName>
- <Description>The main component</Description>
- <Version>1.0.0</Version>
- <ReleaseDate>2016-07-30</ReleaseDate>
- <Default>true</Default>
- <Name>ru.evileg.helloinstaller</Name>
- <ForcedInstallation>true</ForcedInstallation>
- <RequiresAdminRights>true</RequiresAdminRights>
- </Package>
- DisplayName - component name. Required tag.
- Description - description of the component. Required tag.
- Version - component version. Required tag.
- ReleaseDate - Release date. Required tag.
- Default - the default selection component that is selected the option to install or not.
- Name - a packet identifier of a domain name. Required tag.
- ForcedInstallation - It indicates that the component is required for the installation and the user can not exclude it from the installation
- RequiresAdminRights - It indicates that the package must be installed with administrator rights. The field is optional. And the most interesting thing is that in the process installer may lose data administrator rights. That is, for some of the actions will need to re-ask the user administrator rights.
Installer.pro
Here is a version of an assembly installers in separate folders for Release and Debug versions. As well as the repository for the preparation Release versions.
To build the offline installer use binarycreator utility with the following options:
- --offline-only - as is evident from the name, it indicates that collect offline installer
- -c - It specifies the path to the configuration file
- -p - It specifies the path to the folder with the packages, while working QtIFW he will understand so as to form in the installer package with regard to their configuration files and scripts from a meta directory
Note. For the online version of the installer all the same, only the argument --offline-only replaced by --online-only.
A repository for training use utility repogen, with the following parameters:
- -p - indicates the folder with the packages
- -i - Specifies the package to be included in the installer
- -update - It points out that the need to update the repository in the following path. If no repository, the new one will be created in this way.
- # Before run make project, need to put executable file and dlls into
- # $$PWD/installer/packages/ru.evileg.helloinstaller/data
- TEMPLATE = aux
- # Depending on the build mode, determine where it will be collected in installers
- CONFIG(debug, debug|release) {
- INSTALLER_OFFLINE = $$OUT_PWD/../../InstallerDebug/Hello.offline
- INSTALLER_ONLINE = $$OUT_PWD/../../InstallerDebug/Hello.online
- DESTDIR_WIN = $$PWD/packages/ru.evileg.helloinstaller/data
- DESTDIR_WIN ~= s,/,\\,g
- PWD_WIN = $$OUT_PWD/../../HelloDebug
- PWD_WIN ~= s,/,\\,g
- copydata.commands = $(COPY_DIR) $$PWD_WIN $$DESTDIR_WIN
- first.depends = $(first) copydata
- export(first.depends)
- export(copydata.commands)
- QMAKE_EXTRA_TARGETS += first copydata
- } else {
- # set variables that will contain the path name to the installers
- INSTALLER_OFFLINE = $$OUT_PWD/../../InstallerRelease/Hello.offline
- INSTALLER_ONLINE = $$OUT_PWD/../../InstallerRelease/Hello.online
- # set a variable that should contain the path to the data folder
- DESTDIR_WIN = $$PWD/packages/ru.evileg.helloinstaller/data
- DESTDIR_WIN ~= s,/,\\,g
- # set all the path from the application to the DLL need to copy
- PWD_WIN = $$OUT_PWD/../../HelloRelease
- PWD_WIN ~= s,/,\\,g
- # First, you want to compile installers, you must copy the files from
- # the output folder of the project together with all DLL
- # in the data folder, which refers to build packages
- copydata.commands = $(COPY_DIR) $$PWD_WIN $$DESTDIR_WIN
- first.depends = $(first) copydata
- export(first.depends)
- export(copydata.commands)
- # Asking a custom build target, at which the first fulfill kompirovanie files,
- # and then, and the rest that follows the script QMake
- QMAKE_EXTRA_TARGETS += first copydata
- }
- # Create the target assembly Offline Installer
- INPUT = $$PWD/config/config.xml $$PWD/packages
- offlineInstaller.depends = copydata
- offlineInstaller.input = INPUT
- offlineInstaller.output = $$INSTALLER_OFFLINE
- offlineInstaller.commands = $$(QTDIR)/../../QtIFW2.0.3/bin/binarycreator --offline-only -c $$PWD/config/config.xml -p $$PWD/packages ${QMAKE_FILE_OUT}
- offlineInstaller.CONFIG += target_predeps no_link combine
- QMAKE_EXTRA_COMPILERS += offlineInstaller
- # Create the target assembly Online Installer
- INPUT = $$PWD/config/config.xml $$PWD/packages
- onlineInstaller.depends = copydata
- onlineInstaller.input = INPUT
- onlineInstaller.output = $$INSTALLER_ONLINE
- onlineInstaller.commands = $$(QTDIR)/../../QtIFW2.0.3/bin/binarycreator --online-only -c $$PWD/config/config.xml -p $$PWD/packages ${QMAKE_FILE_OUT}
- onlineInstaller.CONFIG += target_predeps no_link combine
- QMAKE_EXTRA_COMPILERS += onlineInstaller
- # the repository will only be collected in the case of release mode
- CONFIG(release, debug|release) {
- # The assembly of the repository is made after it has been collected Installers
- # For this we use QMAKE_POST_LINK instead QMAKE_EXTRA_COMPILERS
- # Since it is well suited for this
- QMAKE_POST_LINK += $$(QTDIR)/../../QtIFW2.0.3/bin/repogen -p $$PWD/packages -i ru.evileg.helloinstaller --update $$OUT_PWD/../../repository
- }
- DISTFILES += \
- packages/ru.evileg.helloinstaller/meta/package.xml \
- config/config.xml
Download the file to the project Qt Installer Framework example

Очень полезная статья. Спасибо большое! Но у меня осталась пара вопросов. Я новичок в QT и не все понятно. Поэтому вопросы будут дилетантские. У Вас уже был создан проект с поддиректориями (это правильно?) включающий в себя проект программы и проект инсталлятора. Для проекта программы, как я понимаю, может при создании быть выбран любой шаблон. А вот, чтобы создать проект инсталлятора, какой должен шаблон необходимо выбрать? Второй вопрос. Вы рассказали про структуру файлов в проекте. Это все понятно. А вот какова должна быть структура файлов на диске. Есть корневой проект HelloInstaller, есть папка HelloInstaller. Есть два подпроекта: Hello и Installer. Так вот вопрос, папки этих проектов должны быть расположены внутри HelloInstaller, рядом с ним, или в любом другом месте? Подозреваю, что можно по разному. Но, на Ваш взгляд, как правильно? Заранее спасибо за ответ!
Да. За основу был взят проект с поддиректориями.
Я не нашёл подходящего шаблона проекта для инсталлятора, поэтому взял пустой проект qmake и уже переписал его для инсталлятора.
Вот как выглядит структура проекта, так и располагаются файлы и папки на диске. То есть есть общая папка HelloInstaller, а в ней уже папки проектов Hello и Installer, а также HelloInstaller.pro. Да, можно, конечно, по-разному. Но не вижу смысла раскидывать подпроекты повсюду, если есть возможность держать всё в одной папке. Будете использовать git-репозиторий, то заметите, что это удобно. Конечно, третьесторонние библиотеки могут располагаться и в другом месте, особенно если они используются в другом проекте, никак не связанном с текущим проектом. Но по-максимуму всё располагайте в одном месте.
Огромное спасибо за быстрый ответ.
Пожалуйста. Будут ещё вопросы, спрашивайте. Только задавайте их на форуме , чтобы были отдельные ветки обсуждений.
Певевести бы это на cmake
А что сделать чтоб qt не тащило весь свой гигабайт в инсталлер?
Конечно, хорошо бы это дело и на cmake сделать, но если честно, в задачах у меня такого нет, а делать специально только это сейчас времени тоже не хватает. увы.
А что касается гигабайта Qt, то обычно QtIFW тянет только необходимое, что в зависимостях и может затащить что-то из QML, если QML не используется, то я бы порылся в документации, скорее всего можно вырубить это. Просто сами все библиотеки, такие как Qt Core имеют вес. Тут никуда не денешься. Но как вариант есть ещё две возможности:
С cmake разобрался. Всетаки писать на нем сильно проще. С размером dll тоже разобрался. windeployqt надо давать флаг --release (тогда библиотеки в 20 раз меньше)
я подумал насчёт debug/release, но мне показалось - это сильно очевидным ))))
Насчёт cmake согласен - он лучше
Если возможность автоматически ставить версию сборки?
Нет, не сталкивался с такой возможностью. Скорее всего только с помощью скриптов это можно решить.
Здравствуйте. У меня вопрос: как добавить файл ресурсов (.rc) к установщику Hello.offline (в этом файле ресурсов - команда включения файла манифеста и информация, которая должна выводиться при нажатии на свойства файла -> подробно) ? У binarycreator есть флаг -r, после которого можно указать ресурсы. Но файлы таким образом просто включаются в исходник, но не обрабатываются! Пробовал также через утилиту windows sdk mt.exe, но она режит размер установщика. Если нет возможности подключить файл ресурсов, то хотя бы нужно, чтобы установщик мог запускаться только под админом.
Насколько помню, то для получения прав администратора нужно добавить в package.xml следующее
Помимо прочего, при написании скриптов установщика можно запрашивать права через функцию gainAdminRights() , но подробного кейса по применению я уже не помню.
Hello Evgenij,
regarding the online installer, I've tried many times to use web host for the created repo after repogen step.
I tried using github but I found people talking it is not possible to to be read by qt ifw and tried google cloud source and code berg but both couldn't be read by the installer.
Do you have a recomendation for a certain web host for the repo? I also want it to be private but I don't want to put a password for the account in the config.xml, so is there another way to give authorization for installer to reach the repo without writing password in plain text?
I know this post is very old but I couldn't find any recent reference online, thanks in advanced.