With the release of Qt 5.8, the QtNetworkAuth module has been added as a technology pending. It's focused on helping developers with their authentication frenzy. Currently OAuth1 and OAuth2 are supported. More authorization methods will be included in the future.
This post focuses on Qt's OAuth2 support. This shows how to use Google Authorization in the app. Your application will be able to show a typical login window like a web application (Note: Browser or WebView required).
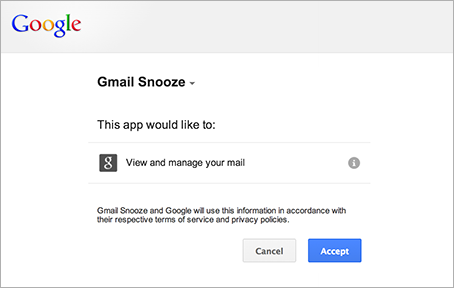
The IETF defines OAuth 2.0 as:
OAuth 2.0 authorization framework allows third party applications to gain limited access to HTTP services, either by the resource owner to organize interaction between the resource owner and the HTTP service, or allow third party applications to gain their own access.
OAuth authorization is also a requirement for using the Google API and for the user to access information stored in Google services such as Gmail, Drive, Youtube, Maps, and others.
Registering your new project
Before you start writing code, you need to register a new project with the service provider. This step is required because you will be prompting for client credentials to identify your application. The following steps are based on the Google API Console, but are similar for other providers.
Create a new project
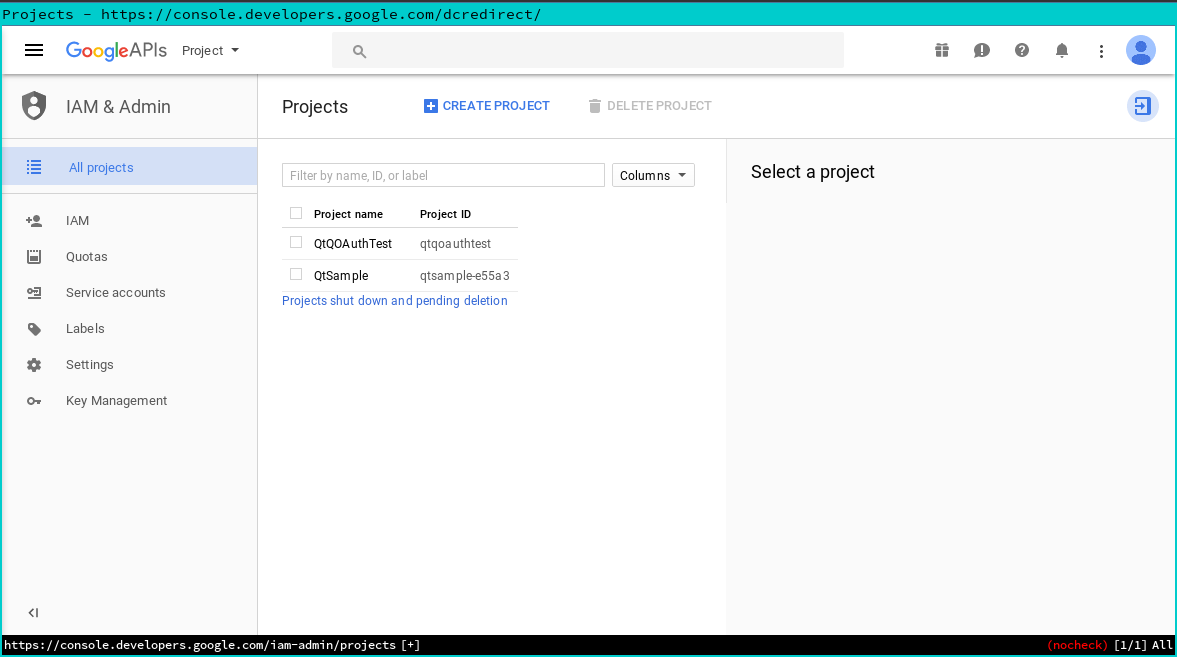
To start registering a project, access the Google API Console , then click “Create Project”.
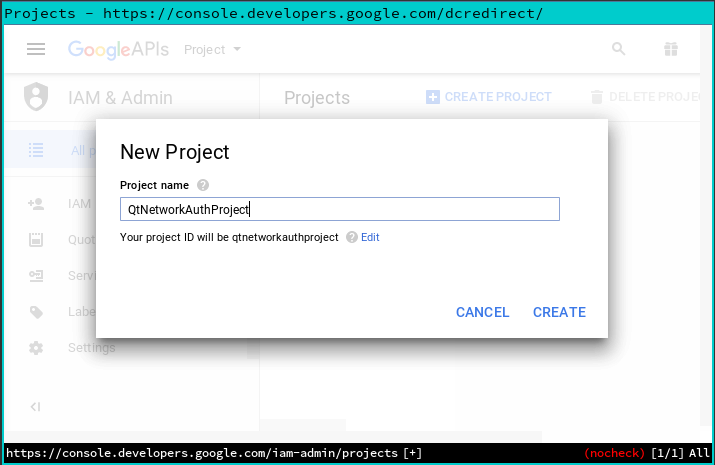
The “New Project” dialog will appear. Type in the name of your project and click the "Create" button. You are now ready to manage your new project.
Your application has been registered, the control panel has been updated and you can set various options from this window.
Creation of credentials
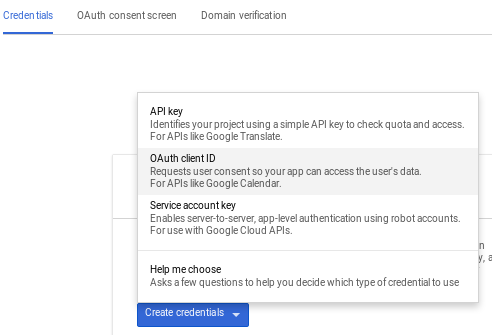
You can get credentials to identify the application. Go to the "Credentials" section and click the "Create credentials" button. You must choose which credentials you need. Select "OAuth client ID".
In the next window, you can set up a "consent screen" with your email address, product name, home page, product logo,... Fill it in with your details and click the "Save" button.
Go back to the “Create client ID” screen and select “Application type”. Various options are available here, you need to select “Web application”. Enter its name.

Under "Restrictions" there is an important field: "Authorized redirect URIs".
If the user chooses to let your application process their data, then the application accepts an "access token" that will be used for authorization requests. "access token" can be accepted in several ways, but the usual way is for your web server to accept the request with "access token". In a web application, the server path is sufficient for processing. In a desktop application, you need to fake the path using a local browser.
Add the Access URI in your browser, including the port if you are using a port other than 80. When the application is launched, the main HTTP server will receive information from the browser.
In most cases, you will need to use a URI similar to: "http://localhost:8080/cb".
Note: The "/cb" path is required in the current QOAuthHttpServerReplyHandler implementation.
Note: You can set up different URIs. This example assumes a single URI.
We complete the process by clicking on the "Create" button and you will see the new identity in the list of permissions with "Edit", "Delete" and "Download" buttons on the right. Click the download button and... And finally, you will get a ready-made JSON file for parsing!
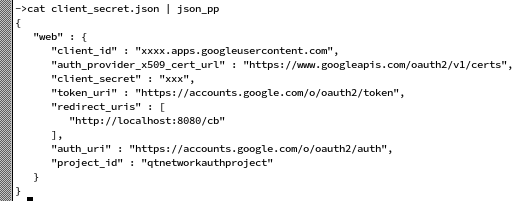
In the screenshot above, you can see some of the new URIs and client_id and client_secret. There is no need to use a JSON file, you can hardcode this information directly into the application.
Write wrapper code for Google API
Part of the class definition has been omitted here to show the relevant code.
Create a QOAuth2AuthorizationCodeFlow object in your code:
auto google = new QOAuth2AuthorizationCodeFlow;
Setting the scope permissions required for your application. This scope defines the permissions of the application. It can be a single string or a list of strings separated by a character defined by the service provider. (Google uses space as a delimiter).
NOTE: scopes vary by vendor. For a list of scopes supported by the Google API, click here .
Let's use the scope from which we will access the user's email:
google->setScope("email");
Connect the authorizeWithBrowser signal to the QDesktopServices::openUrl function to open an external browser and complete authorization.
connect(google, &QOAuth2AuthorizationCodeFlow::authorizeWithBrowser, &QDesktopServices::openUrl);
Parse the downloaded JSON to get the settings and required information. document is an object of class QJsonDocument from the downloaded file.
const auto object = document.object();
const auto settingsObject = object["web"].toObject();
const QUrl authUri(settingsObject["auth_uri"].toString());
const auto clientId = settingsObject["client_id"].toString();
const QUrl tokenUri(settingsObject["token_uri"].toString());
const auto clientSecret(settingsObject["client_secret"].toString());
const auto redirectUris = settingsObject["redirect_uris"].toArray();
const QUrl redirectUri(redirectUris[0].toString()); // Get the first URI
const auto port = static_cast<quint16>(redirectUri.port()); // Get the port
After parsing the file, set up the google. object
google->setAuthorizationUrl(authUri);
google->setClientIdentifier(clientId);
google->setAccessTokenUrl(tokenUri);
google->setClientIdentifierSharedKey(clientSecret);
Create and assign a QOAuthHttpServerReplyHandler as the response handler of the QOAuth2AuthorizationCodeFlow object. A response handler is an object that processes responses from the server and receives tokens as a result of the authorization process.
auto replyHandler = new QOAuthHttpServerReplyHandler(port, this);
google->setReplyHandler(replyHandler);
The grant function will start the authorization process.
google->grant();
If everything is fine, then you should receive a QOAuth2AuthorizationCodeFlow::granted signal and start sending authorization requests.
You can try to send a request using https://www.googleapis.com/plus/v1/people/me
auto reply = google->get(QUrl("https://www.googleapis.com/plus/v1/people/me"));
This will give you QNetworkReply and when signal QNetworkReply::finished will be called so you can read the data.
Источник Qt Blog

При помощи данного класса можно получить доступ к google.com/webmaster?
Да. Можно. У Google есть соответствующее API. Поищите в гугле по запросу Google Search Console OAuth API
Пытаюсь прикрутить к облаку яндекса и пока без успешно, кто-то пробовал с яндекс апи работать под этим классом?
Лично я не пробовал работать с Яндекс API, не возникало такой нужды.
Жаль, а то проблемы возникли, по гайду с гуглом у меня всё чётко, а при работе с яндексом почему-то не работает, а в дебаг пишет мол 404, хотя я лично своими руками в браузере через аякс запрос постом нормально получаю токен, а класс чёт не хочет.
Возможно, стоит Wireshark`ом запросы посмотреть. В чём отличие идёт аякс запроса от запроса из библиотеки. Возможно, что не хватает какой-нибудь заголовочной информации.
А с DropBox работали?
Нет
Пробовал играться с шарком, либо я криво смотрел, либо почему-то POST запросы на oauth.yandex.ru не летят, хотя должны постом лететь, я и исходники QOAuth2AuthorizationCodeFlow ковырял на предмет метода отправки, вроде бы везде POST, но в браузере GET открывается, ничего не понятно.
У меня пока мыслей на этот счёт нет ((
Спасибо за статью.
Я правильно понял, что в консольных программах использовать данный способ авторизации не получится? (QDesktopServices требует QtGui.) Или QtNetworkAuth можно и по-другому использовать?
Вы можете написать консольную программу и использовать библиотеки QtGui. Я, например, использовал QImage и другие классы из QtGui в одной консольной программе. В этом нет никакой проблемы. Создаёте консольное приложение и подключаете в pro файле gui модуль.
Ну в общем-то, да. Тащить только дополнительные зависимости в код придётся.
Меня, в общем-то, авторизация в гугле заинтересовала, поскольку я пытаюсь в свой редактор контактов добавить импорт адресных книг с сетевых ресурсов. (Нет, сам он не консольный, а вполне себе оконный, просто на той же кодовой базе у меня есть и простой конвертор с интерфейсом командной строки.) Загрузка с ресурсов вроде ownCloud/Nextcloud у меня уже работает через CardDAV, но в случае с гуглом всё сложнее именно из-за авторизации...
Зависимости... здесь вопрос в том, что "Вам шашечки или ехать?".
Интересный результат получается. В Qt 5.8 получаю в браузере сформированное окно авторизации. А в новейшей Qt 5.10 - ошибку 400 с текстом "The redirect URI in the request, http://localhost:8080/, does not match the ones authorized for the OAuth client". Да, именно с таким URI, без /cb на конце, хотя он у меня всюду вбит. Исходные данные одинаковы. Что-то поломали...
Мне кажется, что в Qt 5.10 много чего поломали... Вот на форуме некоторые обсуждения идут и создаётся впечатление, что много чего испортили даже в том же QML.
Кажется, начало что-то получаться. :)
Как я понял, пример проверочного вызова в конце статьи не совсем правильный (заглянул в английский оригинал - там то же самое). Токен сам к запросу не добавляется, его надо добавить вручную. Например, приведённый запрос для гуглоплюса у меня сработал в следующей редакции:
    QNetworkReply* reply = google->get(QUrl(
         QString("https://www.googleapis.com/plus/v1/people/me?access_token=%1")
             .arg(google->token())));
Ну и Google+ API при этом, конечно же, надо разрешить в настройках аккаунта (автор этот момент не раскрыл).Добрый вечер. Интересует возможность получения email адреса, указанного при авторизации данным методом. Результат выводик как на скриншоте, но хочется увидеть конкретный адрес. Буду благодарен за любую помощь
