Installation of couplings
Mounting of couplings shall be in accordance with installation instructions for the particular type of coupling of the manufacturer (supplier) couplings. Connection of optical fiber mounting couplings should be carried out under the control of the welding method of attenuation OTDR. The value of a welded joint fiber attenuation, calculated in the direction A - B, B - A, should not exceed 0.1 dB. Each coupling after installation should be the marked sheet of lead or plastic ring tag. Each mounted clutch must be drawn up in duplicate passport. One copy is placed in the sleeve, the second is attached to the as-built documentation. If it provided by the project, and then the optical coupling OK stock placed in a specially made case, which must be secured to the support.
On the local communication networks, mainly to be used optical coupling of domestic manufacturers, designed to meet current technical requirements and compliance with the declaration of the Ministry of Information Technologies and Communications of the Russian Federation. Is allowed to use on the local networks of optical coupling of the foreign producers if the certificate of conformity and standard solutions for installation, mounting and protection of optical couplers in their places of assembly.
Optical Coupler for armored OK, laid in the ground, should ensure that:
- the ability to electrically connect the screens or metal power elements matched OC structural elements of at least 2.5 mm2;
- the ability to lead wires of the metallic elements construction OC, separately for each OC to connect to an external ground.
Workplace organization
Workplaces for the coupling assembly may include the following:
- Specially equipped assembly machine;
- Wells;
- City sewers;
- Premises input cables;
- Tents set about wells, pits, poles.
The state of the group for the installation and instrumentation couplings should be as follows:
- Engineer-meter;
- Two installers;
- Driver of the machine.
Ends matched OC, if anywhere clutch placement serves to organize the workplace (in the mounting machine, the tent, and so on. P.), Cut up and perform the installation according to the installation of this type of coupling. Installers must have a set of tools and devices needed for cutting OC, welding optical fibers, shrinkage CRSS, assembly and sealing joints of any kind. Optical coupling is fixed on the table using a mounting bracket assembly, allowing the clutch to establish at any position in proximity to the welding device.

Installation tools

Bracket for mounting couplings ## The order of assembly operations
- cutting OC: clean, incisions and removal of shells, armor, filling hydrophobic core and modules; cutting power components surplus cleaning fibers of hydrophobic aggregate;
- putting the coupling parts - end cap, the introductory parts kits to pre-peeled cable ends;
- OC perform longitudinal sealing by using tubes or sealant tape - mastics;
- OC consolidation on internal coupling elements (trays, the brackets, etc...);
- OC splicing metal elements or output ground wires from each reservation OC;
- laying stock optical modules;
- beam shaping optical modules for putting them into separate cassettes;
- marking modules using adhesive markers; binding sheaves of modules on the tape inputs;
- preparation of fibers for welding: marking, putting on one of the CRSS spliced fibers, removal of coatings with Optical fiber, Optical fiber shearing, stacking prepared for welding in the OB clamp welding device;
- OM welding and weld inspection attenuation using OTDR;
- a decision on the abandonment or alteration of the weld joint;
- CRSS liner shrinkage in a special unit of the welding apparatus;
- CRSS stacking cassette into the cradle, and the simultaneous laying of reserves under the OM tape tabs;
-
Welding in all Optical fiber coupling cassettes;
setting cassettes to trays (brackets) couplings, assembly of the cassettes into the unit and installation of a cover on the - top unit tape fastening tapes in the tray unit (bracket) of the coupling;
- fastening inside clutch pack silica gel;
- assembly of the coupling body, degreasing and stripping of cables and the coupling parts in places overlay sealants;
- inspection of all welded joints of the integrity of the OTDR;
- a decision on sealing couplings;
- sealing of: shrinkage, tightening straps, etc .;
- laying clutches and reserves OC in the well (pit) or suspension and coupling stock OC;
- mounting and coupling guard and reserves OC at the installation site;
- check attenuation measurement of all welded joints OTDR in order to clarify whether the increased attenuation of joints after clutch installation. If the damping joints increased in the clutch and laying stocks OK, then stocks should again be unwound and place so that the tension in the cable did not arise, and the attenuation is not increased.
Checking the mounted couplings for leaks

Caps for optical coupling pipes
Sealed optical couplings after all assembly operations should be provided by their designs and kits, and guaranteed by the manufacturer. Accuracy of performing assembly operations and the quality of the sealing must be checked by inspection.
At the request of customers coupling types MOG-M and MTOK can be checked by local pressure. To this end, one of the free nozzle auditee should clutch shrunk cap with valve for the supply pressure. On request, such caps may be provided with couplings.
Placement of mounted couplings
Mounted optical coupling MOG-M model in wells and reservoirs with the distance between the brackets 800 and 900 mm should be laid on the console.
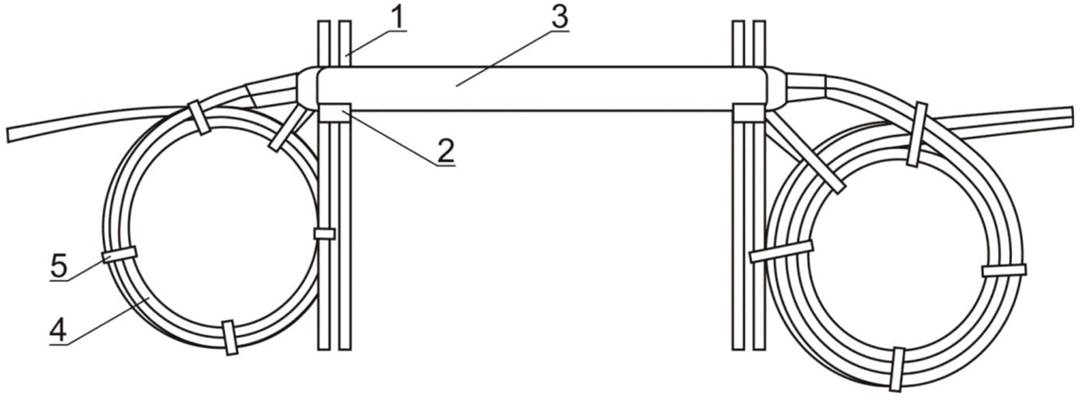
Placement the coupling on the console 1. Brackets of steel strips or corners, the distance between the brackets is typically a well - 800 mm in the reservoir - 900 mm;
2. console cable, cast iron or plastic;
3. MOG-M coupling;
4. Bay reserve OK, leave about couplings;
5. ligation of wire
In the non-standard viewing devices, connectors, basements, etc., must be installed with clutch housings at length: shorter clutch can-M, and blind coupling MOG-M, MTOK 96T, MTOK 96/48. MTOK type couplings in wells and reservoirs must be installed on brackets for installation in the clutches of blind wells.
Placement in the coupling device, non-standard sight 1. optical coupling deadlock MTOK or CDP-M;
2. Bracket for installation of blind optical couplers in the wells;
3. Bracket equipping wells; .konsolny bolt;
4. ruff;
5. Technology stock spliced cable is coiled;
6. fastening cables to the brackets and couplings dressings wire
Couplings type MTOK mounted on cables laid in the ground, must be placed in trenches at a depth of 1200 mm. In these pits optical couplings must be protected with protective sleeves: iron or plastic.
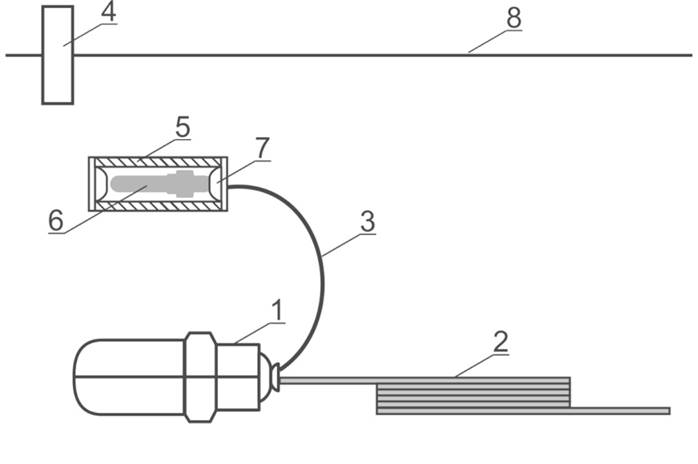
Placement in the ground sleeve 1. Optical coupling of the coupling type MTOK protective iron;
2. OC stock, is coiled;
3. ground wire, coming out of the clutch;
4. Metering column;
5. section of asbestos cement pipes with a diameter of 100 mm;
6. underground container ground wires (CTC);
7. plastic tube;
8. soil surface.
Bay reserves optic cables in trenches should be spread to one or two bays, depending on the design of the OC and the permissible bending radii.
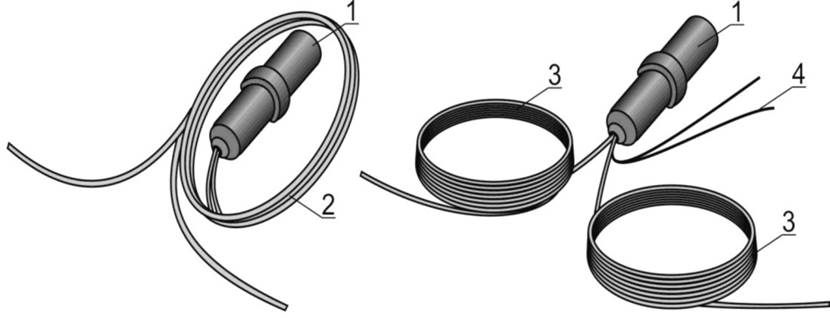
Laying fiber optic cables stock 1. MTOK clutch in iron shell;
2. OC stock type 1;
3. OC stocks type 2 or 3;
4. ground wire.
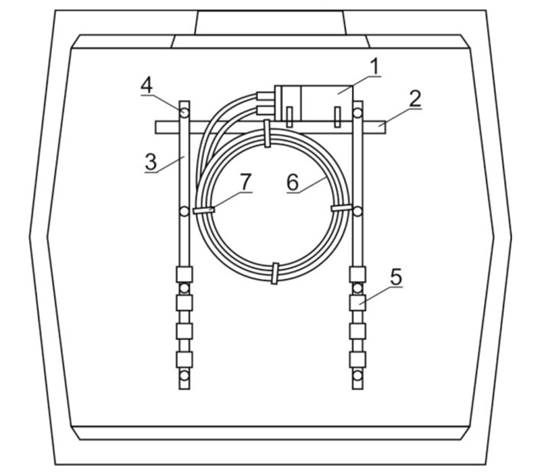
In support of contact network of electrified transport, lighting poles for overhead line supports coupling and supplies OC, if provided by the project, should be placed in special cabinets that are secured to supports.
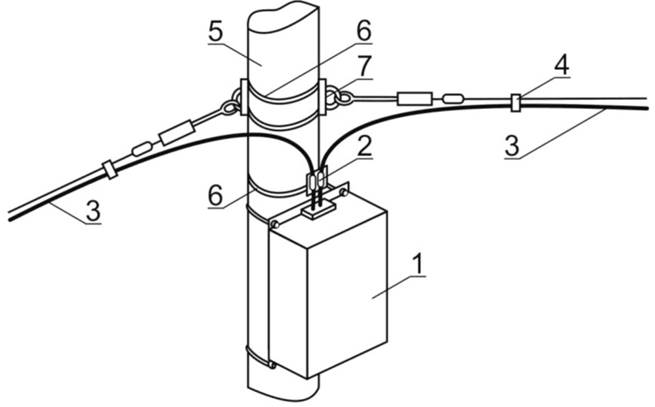
Placement the coupling in the closet
- wardrobe to accommodate the coupling;
- a loop clip;
- OC;
- Aluminum suspension;
- support;
- band clamp;
- attachment point.
Installation of end-point equipments
General mounting of optical terminal devices are the following assembly operations:
- Checking the contents of the terminal device, and an input control station optical patch cord included in the package;
- Marking line cable;
- determining the length of the cutting OC;
- determination of the length reserve OC;
- summing up OC tothe terminal;
- cutting OC;
- OC input terminal and mounting it to the entrance of coupling;
- OC grounding metal elements;
- laying stock optical modules;
- beam shaping optical modules for entering them on separate tapes;
- marking modules using adhesive markers;
- binding sheaves of modules on the tape inputs;
- preparation of fibers for welding: marking, putting on one of the CRSS spliced fibers, removal of coatings with optical fiber, optical fiber shearing, stacking prepared for welding in the optical fiber clamp welding device;
- OM welding and weld inspection attenuation using OTDR;
- a decision on the abandonment or alteration of the weld of the compound;
- CRSS liner shrinkage in a special unit of the welding apparatus;
- CRSS laying the liner in the cradle cassettes and simultaneous laying of reserves under the OM tape tabs;
- Welding OM all cassette coupling;
- Inserting a tape on the studs coupling assembly cassettes into the unit and installation of a cover on the top unit cassette tapes securing block heels coupling;
- coupling assembly housing;
- Installation coupling in its place in the rack or on the wall; Mount OC on the approaches to the end-point equipment.
After mounting on the front panel of optical terminals, or on their caps, or special adhesive labels and tags supplied with the devices with paint or marker pens should be applied to labels indicating their serial numbers, numbers of optical cables and lines.
